
In this category Integrations
Server-side tracking with Stape and Google Tag Manager
Send Google Analytics data through your online shop's own domain with Stape and a Google Tag Manager server container. What it gives you, what it does not, and the whole setup step by step.
On this page
With server-side tracking your online shop no longer sends data directly to Google. Instead, the visitor's browser sends data to a subdomain of your shop, e.g. abc123.minshop.dk. Behind that subdomain a Google Tag Manager server container runs at Stape, and it passes the data on to Google Analytics.
We have set it up in our own test shop and measured what it gives. This guide follows that setup, including the places where Google and Stape did not do the right thing by themselves. It covers Google Analytics 4 with our Google Analytics code.
What it gives, and what it does not
It gives you:
- Data goes through your own domain. The browser does not talk to google-analytics.com or googletagmanager.com. Programs and networks that block Google's domains therefore do not block your data. We tested this by blocking Google's domains in the browser: every event still arrived.
- Control on the server. You decide what is passed on to Google. For example, the Google Analytics tag in the server container can remove the visitor's IP address before the data is passed on.
It does not give you:
- More data from those who say no. Consent works exactly as before. If the visitor says no, the code sends only the anonymous, cookieless measurements that Google Consent Mode allows.
- Data from uBlock Origin. The most widely used ad blocker also blocks Google's code and measurements on your own subdomain, because it recognises the addresses. We measured this with uBlock Origin Lite and its default lists. The same probably applies to Brave.
- Longer cookies in Safari. Safari keeps the Google Analytics cookie for 7 days at most, also with server-side tracking.
There is also a risk: if the subdomain is down, or your plan at Stape is paused, no data reaches Google Analytics at all.
Stape has a feature that also gets past uBlock (Custom Loader with "Enhanced ad blocker protection"). We tested it and chose not to use it, because it makes the setup considerably more complicated. It is not part of this guide.
What it costs
Stape charges by the number of requests to your server. In our test each page view gave 2 to 6 requests (Google's code, the measurements and a helper file).
- Free: 10,000 requests a month. It is only for trying out the setup. When the limit is reached, Stape switches the container off until you upgrade.
- Pro: 500,000 requests a month for €20 a month (in November 2026). That covers most online shops.
Turn on automatic upgrading (see step 3). Otherwise Stape pauses the container once you have used 10% more than your plan, and you lose data. See Stape's prices (opens in a new tab).
Stape processes data on behalf of your visitors. Choose a server in the EU, and keep Stape's data processing agreement (see step 3). Stape's log keeps each measurement with the visitor's IP address and browser for 3 days on Pro. Add Stape to your privacy policy as a data processor.
What you need
- Google Analytics set up with our code, and a cookie banner that tells the code about consent.
- A Google account with access to Google Tag Manager (opens in a new tab).
- Access to change the DNS for your domain. If your DNS is with us, you do it in the customer login (see Name service (DNS)).
Follow the steps in the order given. The server container in Tag Manager must exist before you create the container at Stape.
1. Create a server container in Google Tag Manager
- Go to Google Tag Manager (opens in a new tab), and create an account if you do not have one.
- Click Create container under your account.
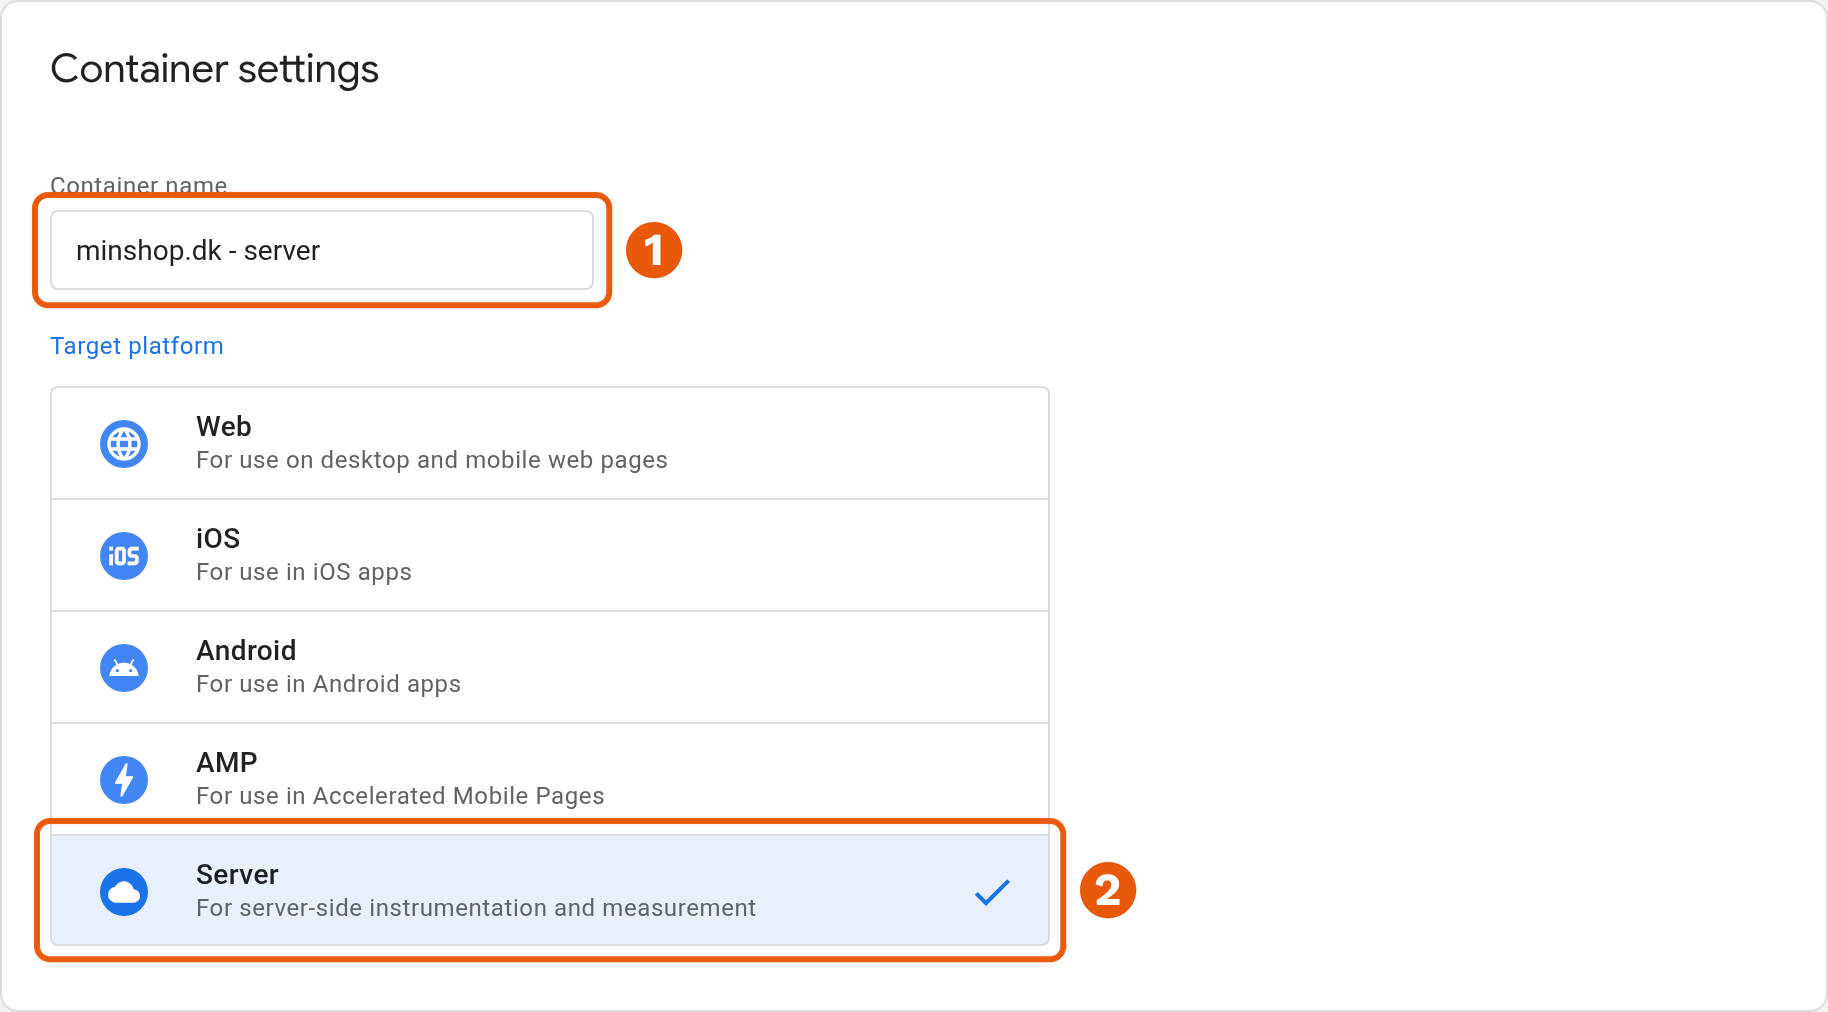
- Enter a name, e.g. "minshop.dk - server", and choose Server under Target platform. Click Create.
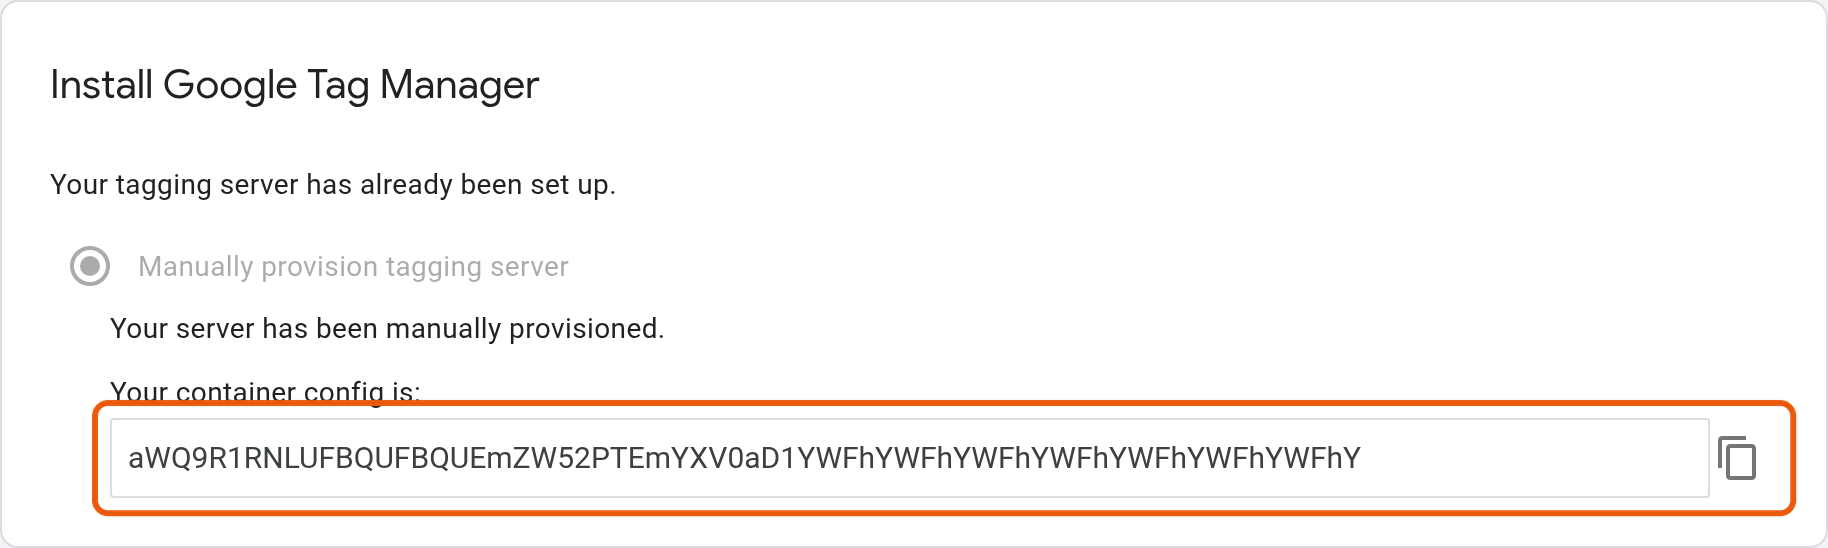
- Choose Manually provision tagging server in the window that appears.
- Copy the text under Your container config is:. You will need it at Stape. Leave Tag Manager open.
2. Create a container at Stape
- Create an account at stape.io (opens in a new tab), and choose EU under Customer data storage location. Your data and your account at Stape are then kept in the EU.
- Click Create sGTM container.
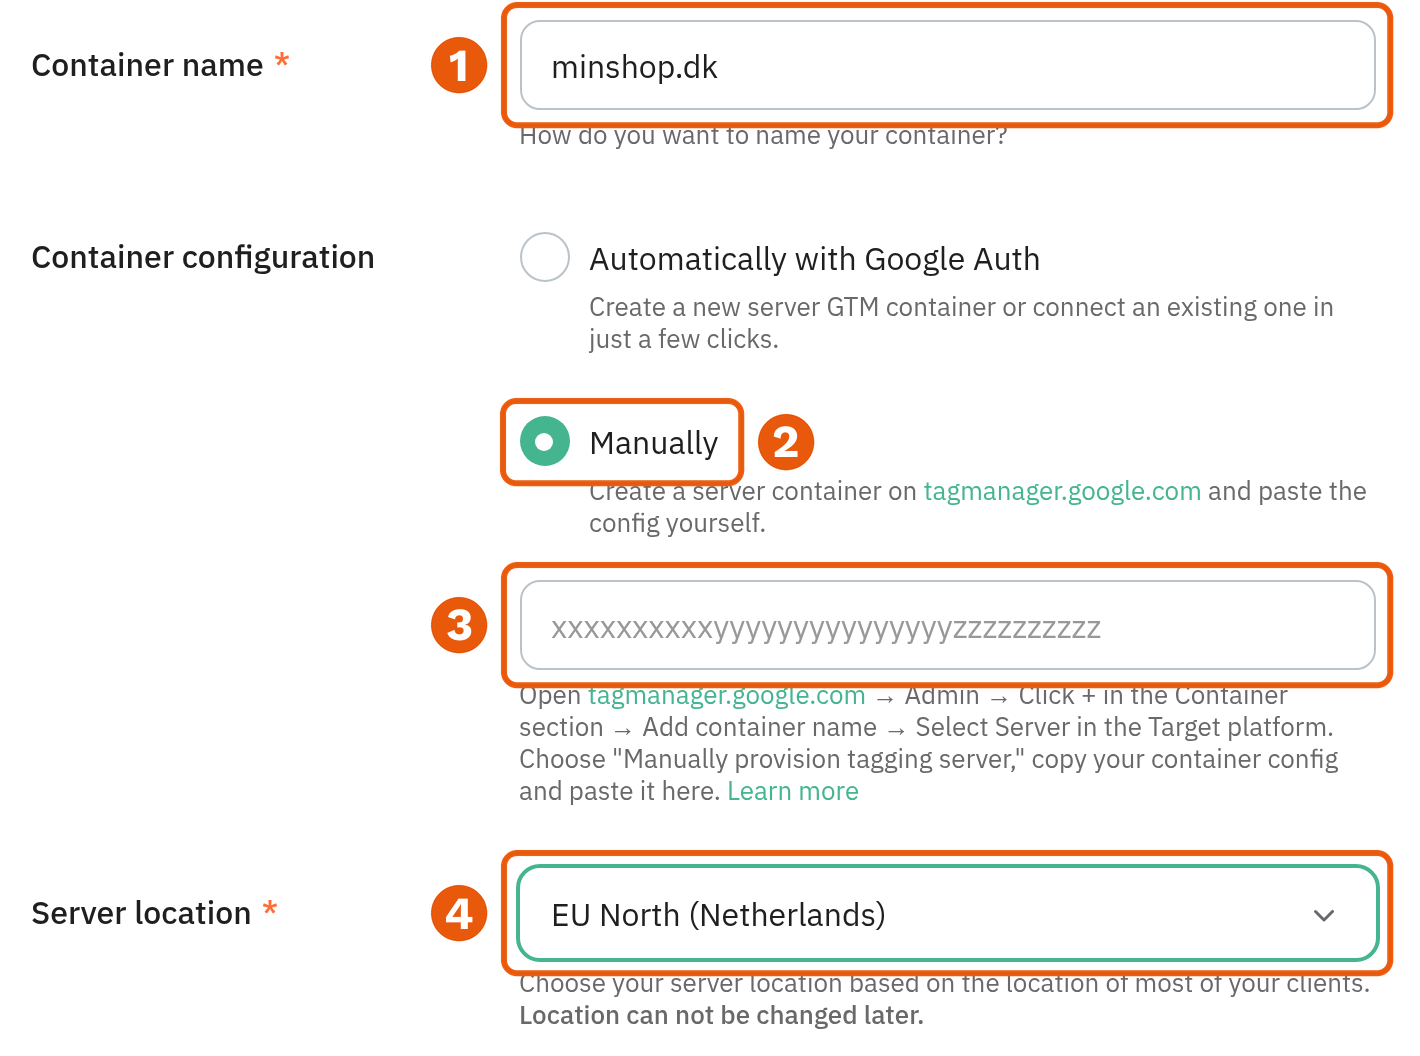
- Enter your shop's name under Container name, choose Manually under Container configuration, and paste the text from Tag Manager into the field.
- Choose a server in the EU under Server location, e.g. EU North (Netherlands). It cannot be changed later.
- Create the container.
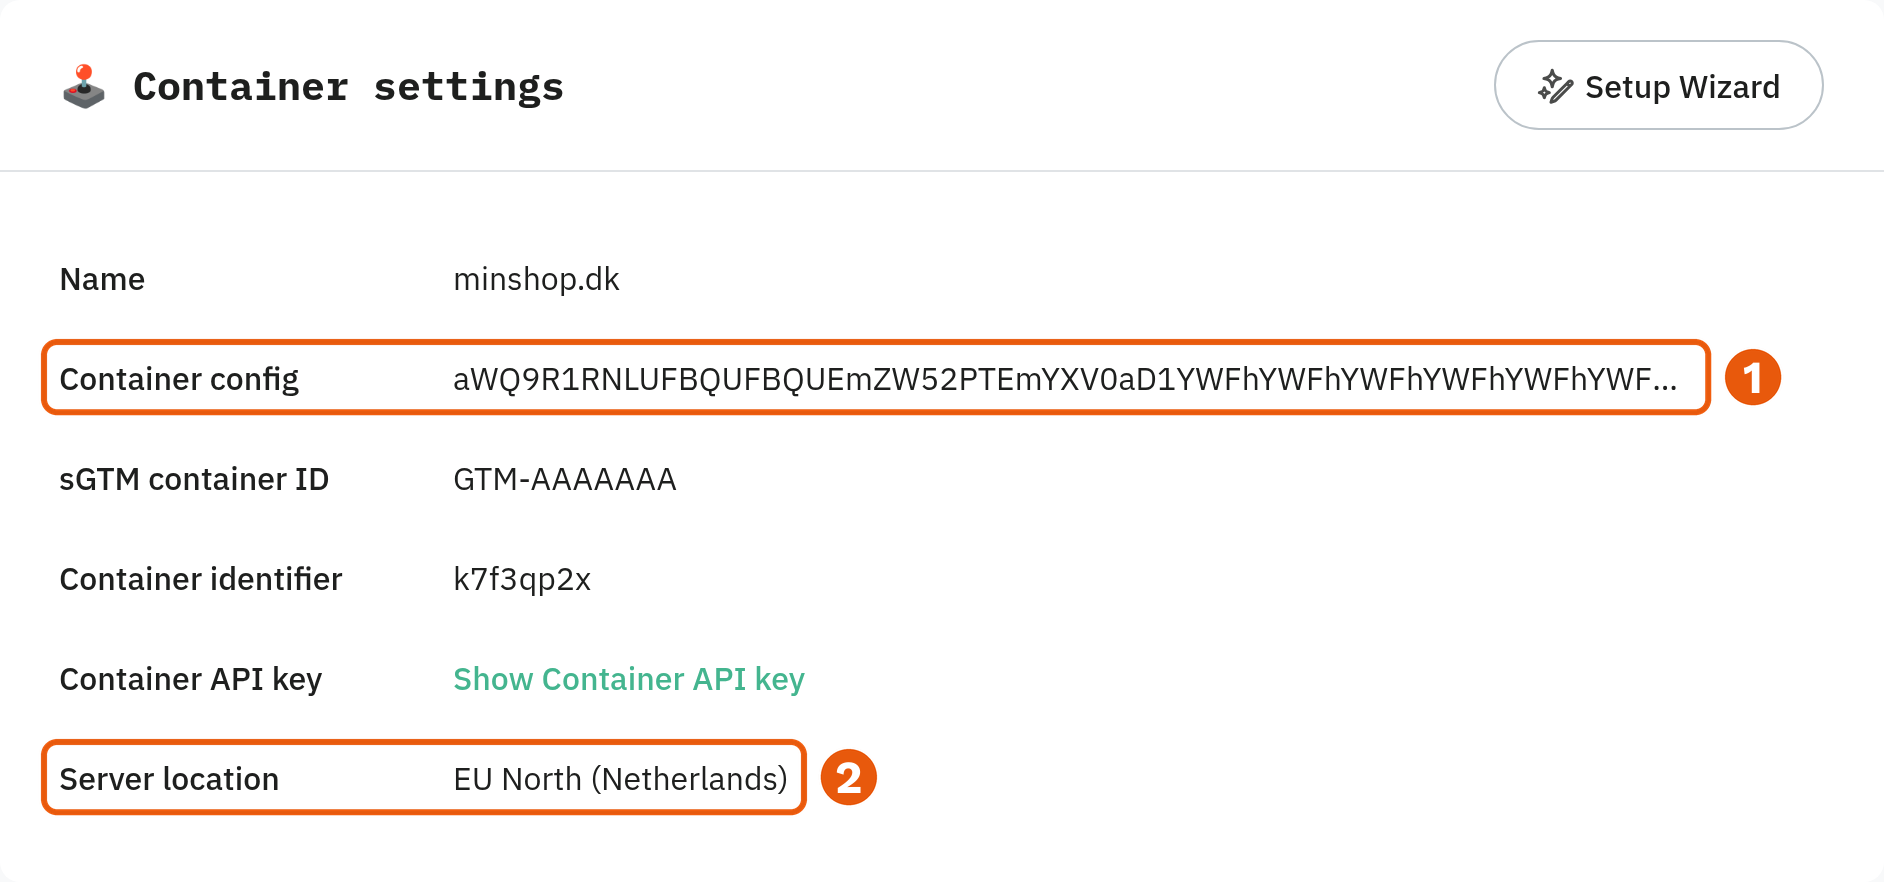
Once the container is created, you see it under Settings with the server location and the ID it belongs to in Tag Manager.
3. Choose a plan, automatic upgrading and the data processing agreement
- Choose Pro under Change plan on the container.
- Turn on Upgrade container to the next tier automatically on the Subscription tab. Then measuring continues if a campaign brings more visits than the plan covers.

- Read Stape's data processing agreement for the EU (opens in a new tab). It applies automatically once you have accepted Stape's terms when creating the account. Keep it with your other data processing agreements.
4. Add your subdomain
The subdomain is the address the browser sends data to. Use a name that does not give away what it is. Stape advises against words such as ad, gtm, tracking, analytics and stape, because ad blockers look for them. Stape suggests a random name itself, and you can simply use that.
- Go to Domains (Tagging Server URLs) on the container, and click Add new.
- Enter the subdomain, e.g.
abc123.minshop.dk, leave CDN switched off, and choose Manually under How to connect. Click Next. - Stape now shows the DNS record you need to create: a CNAME with the subdomain as the name and Stape's address as the value.
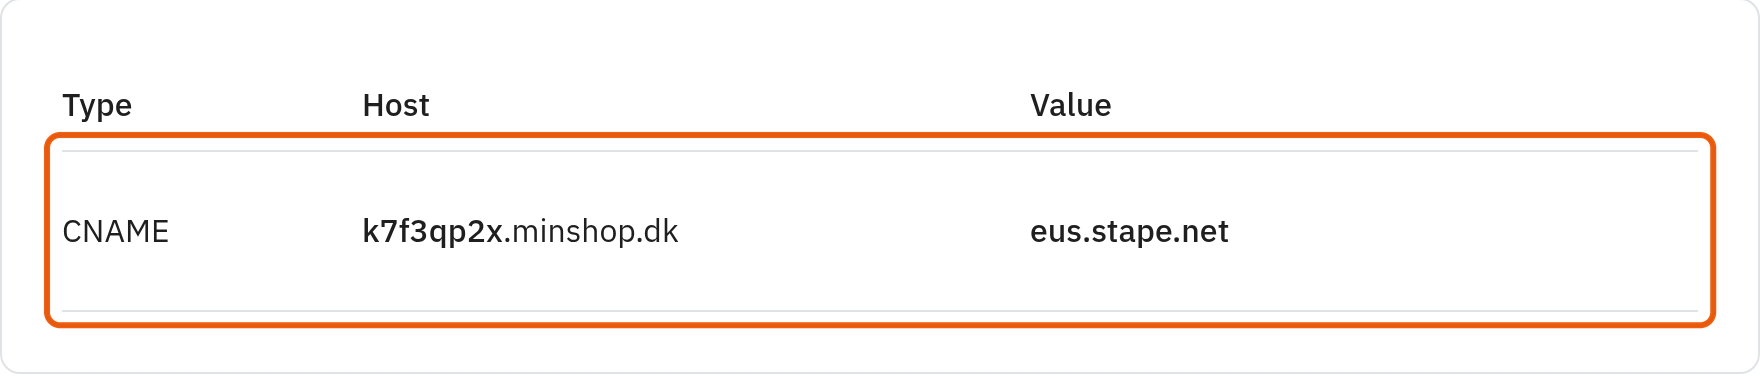
- Create the record wherever your domain has its DNS. If your DNS is with us, see Name service (DNS).
- Click Verify at Stape. The status changes to Ready when Stape has found the record and made a certificate. For us it took 7 minutes. Stape says it can take up to 72 hours. You see the status by clicking ... next to the subdomain and choosing View details.
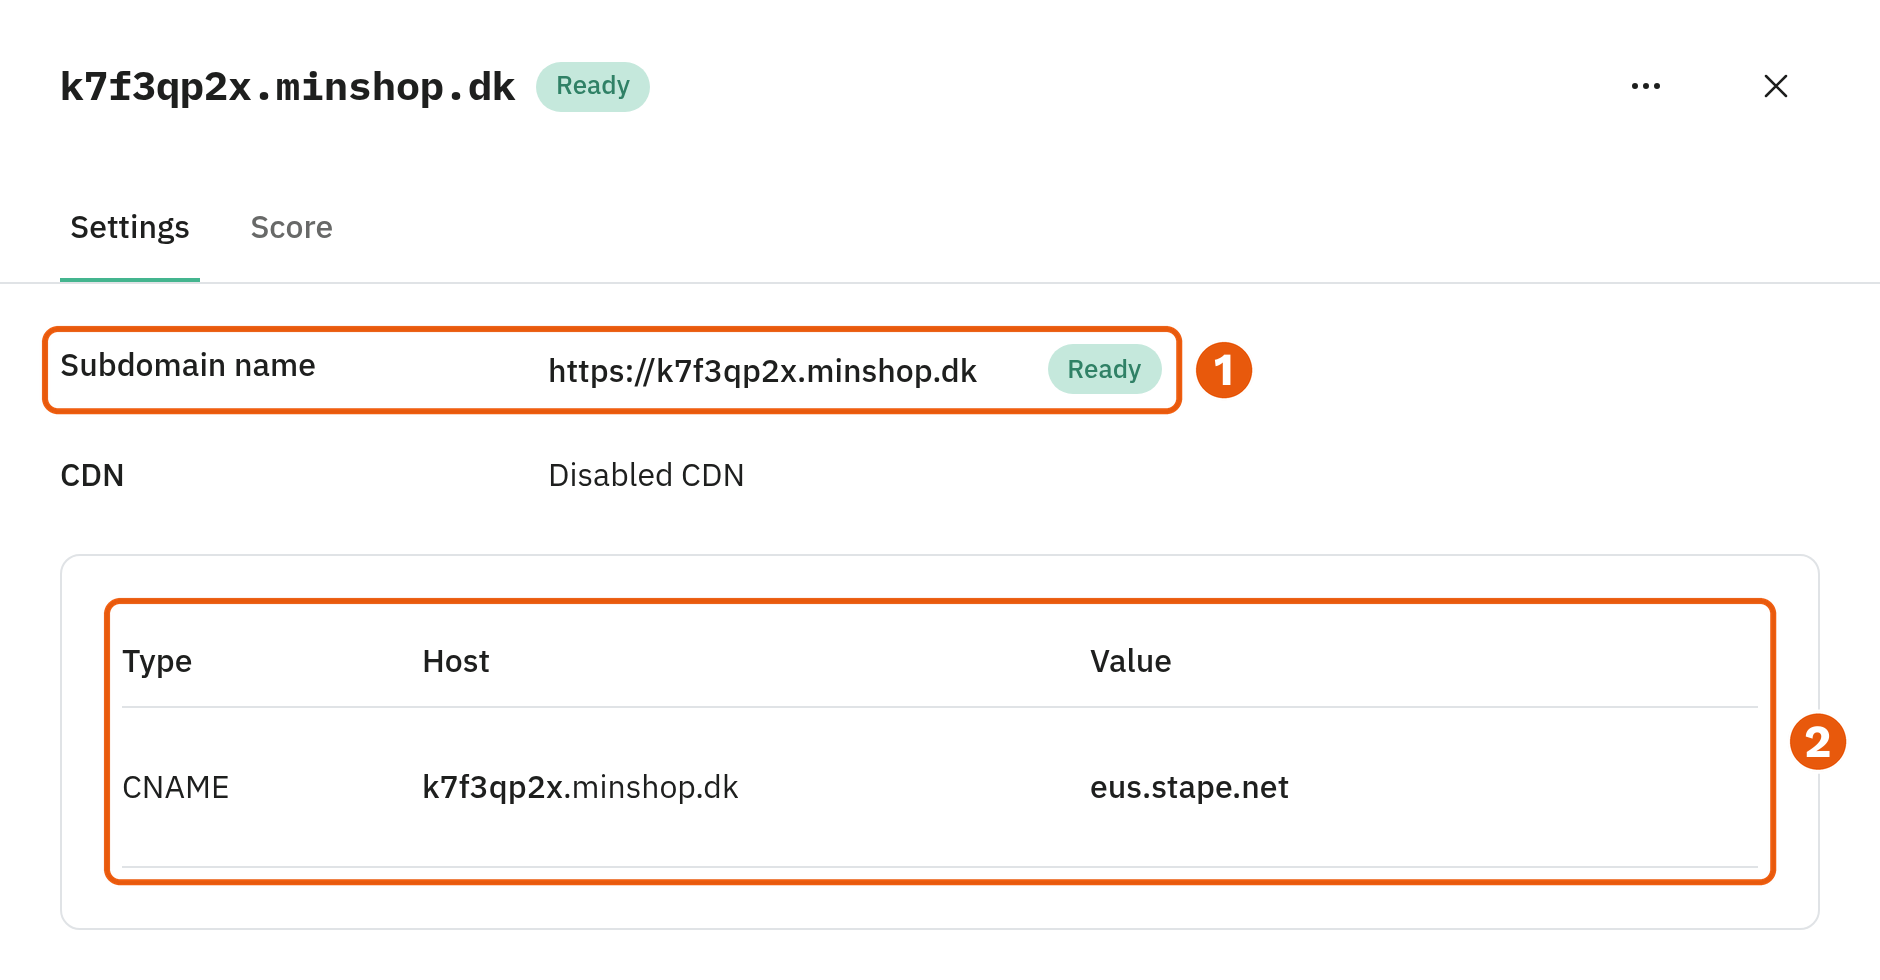
5. Set up the server container in Tag Manager
Go back to your server container in Tag Manager.
Cookies: JavaScript Managed
- Click Clients, and open GA4.
- Click More Settings, and choose JavaScript Managed under Cookies and Client Identification. Click Save.
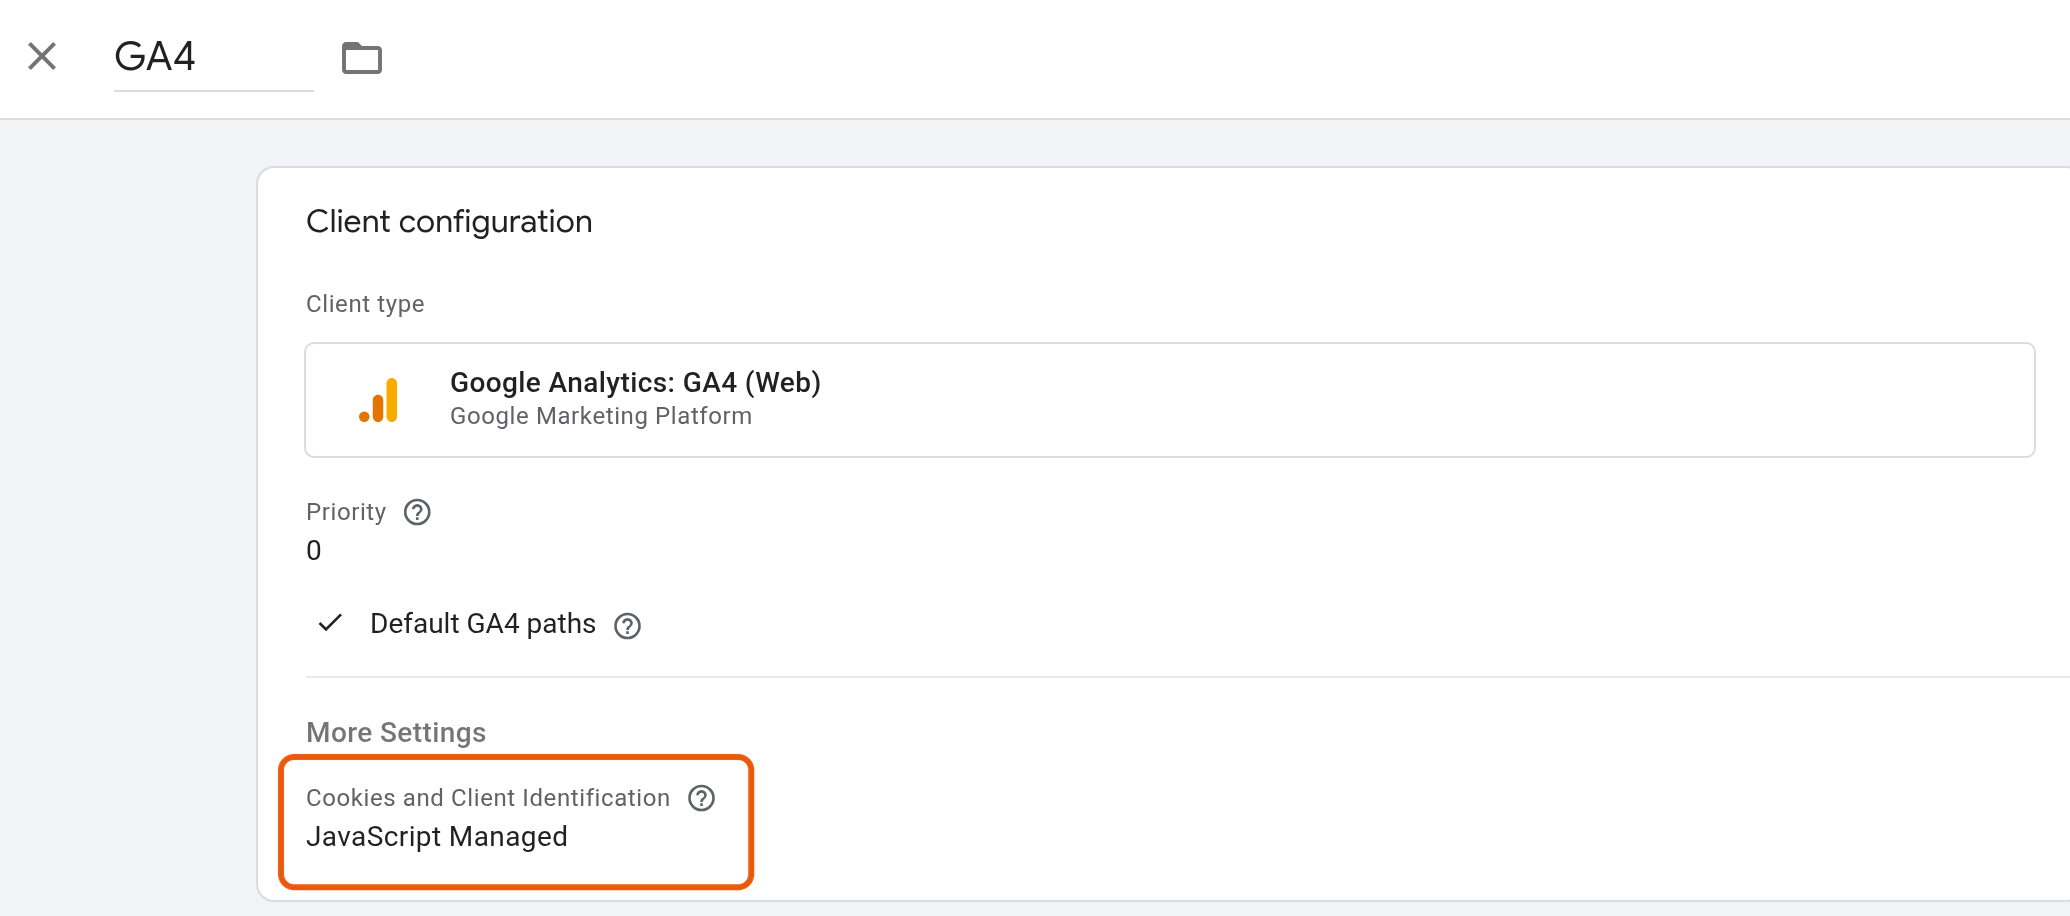
The default is Server Managed. The server then sets its own cookie, which a cookie banner cannot delete. If a visitor withdraws their consent, that cookie stays. With JavaScript Managed the cookie banner deletes all of it.
Google's code from your own domain
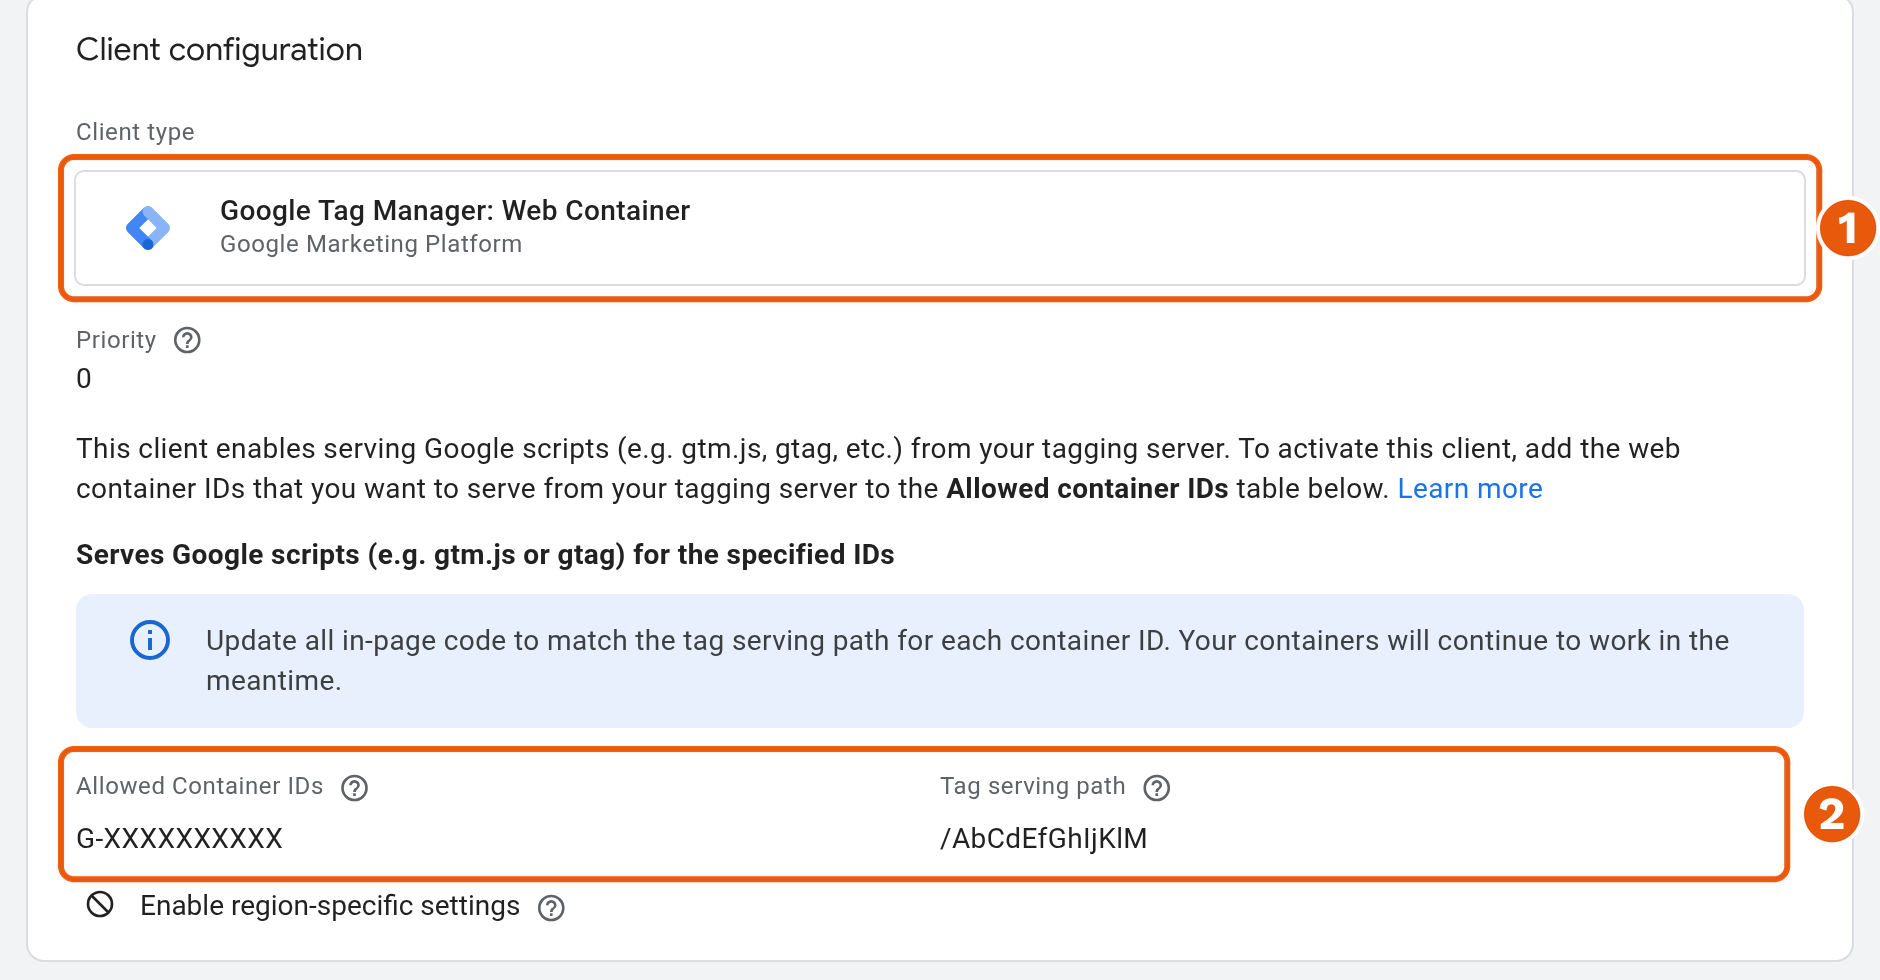
- Click Clients and New, and choose Google Tag Manager: Web Container.
- Click Add Container ID, and enter your measurement ID from Google Analytics (it starts with G-).
- Untick Enable region-specific settings. Otherwise the client cannot be saved.
- Give the client a name, e.g. "Google scripts (gtag.js)", and click Save.
Pass the data on to Google Analytics
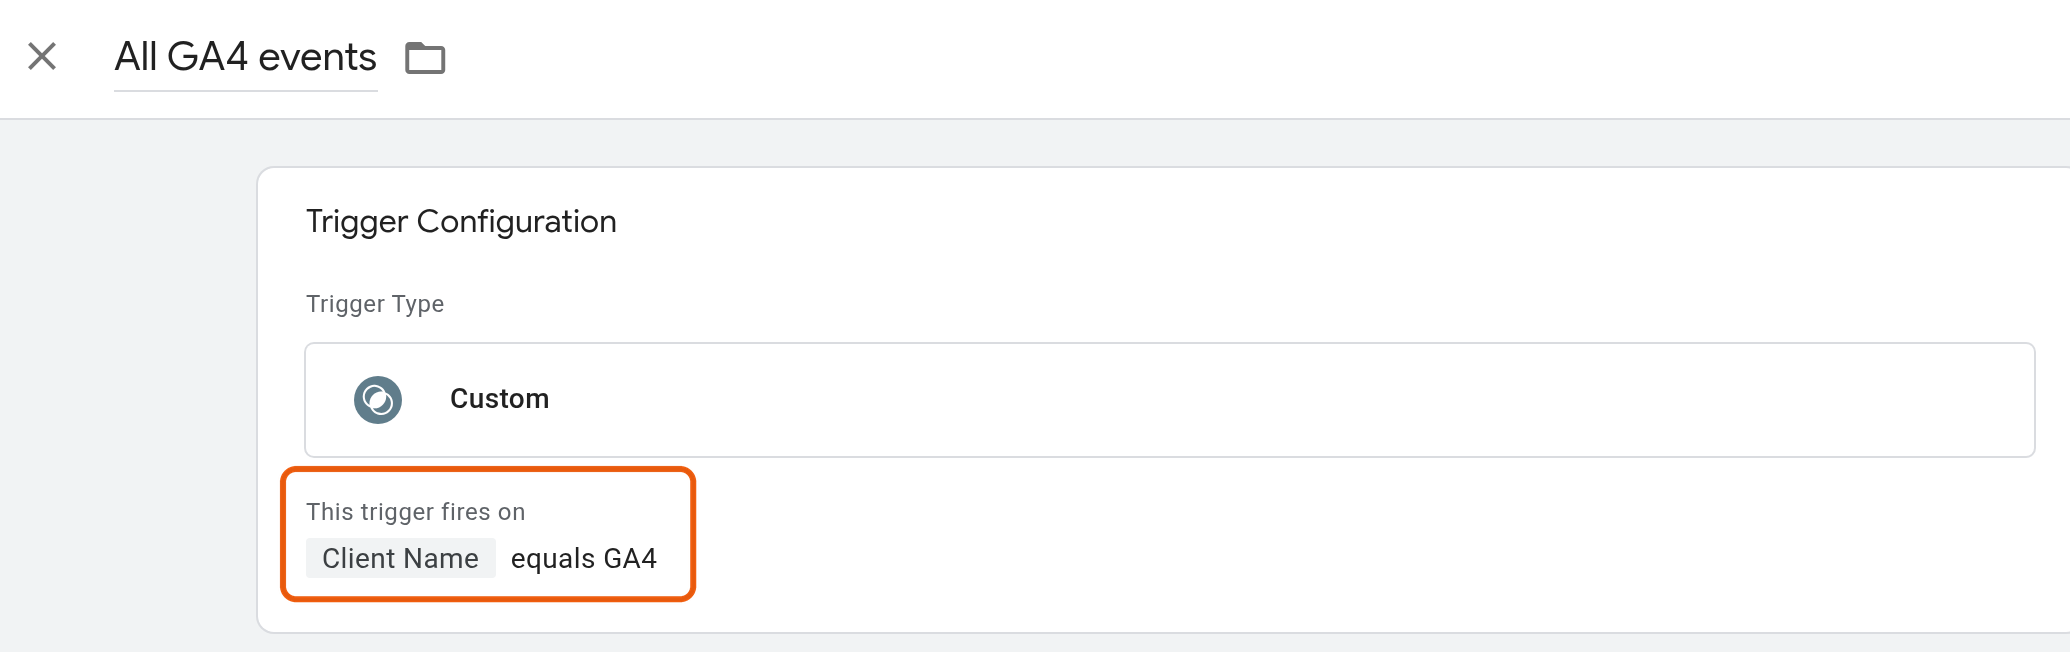
- Click Triggers and New. Choose Custom and Some Events.
- Choose the variable Client Name (under Choose Built-In Variable if it is not in the list), equals and enter
GA4. Give the trigger a name, e.g. "All GA4 events", and click Save.
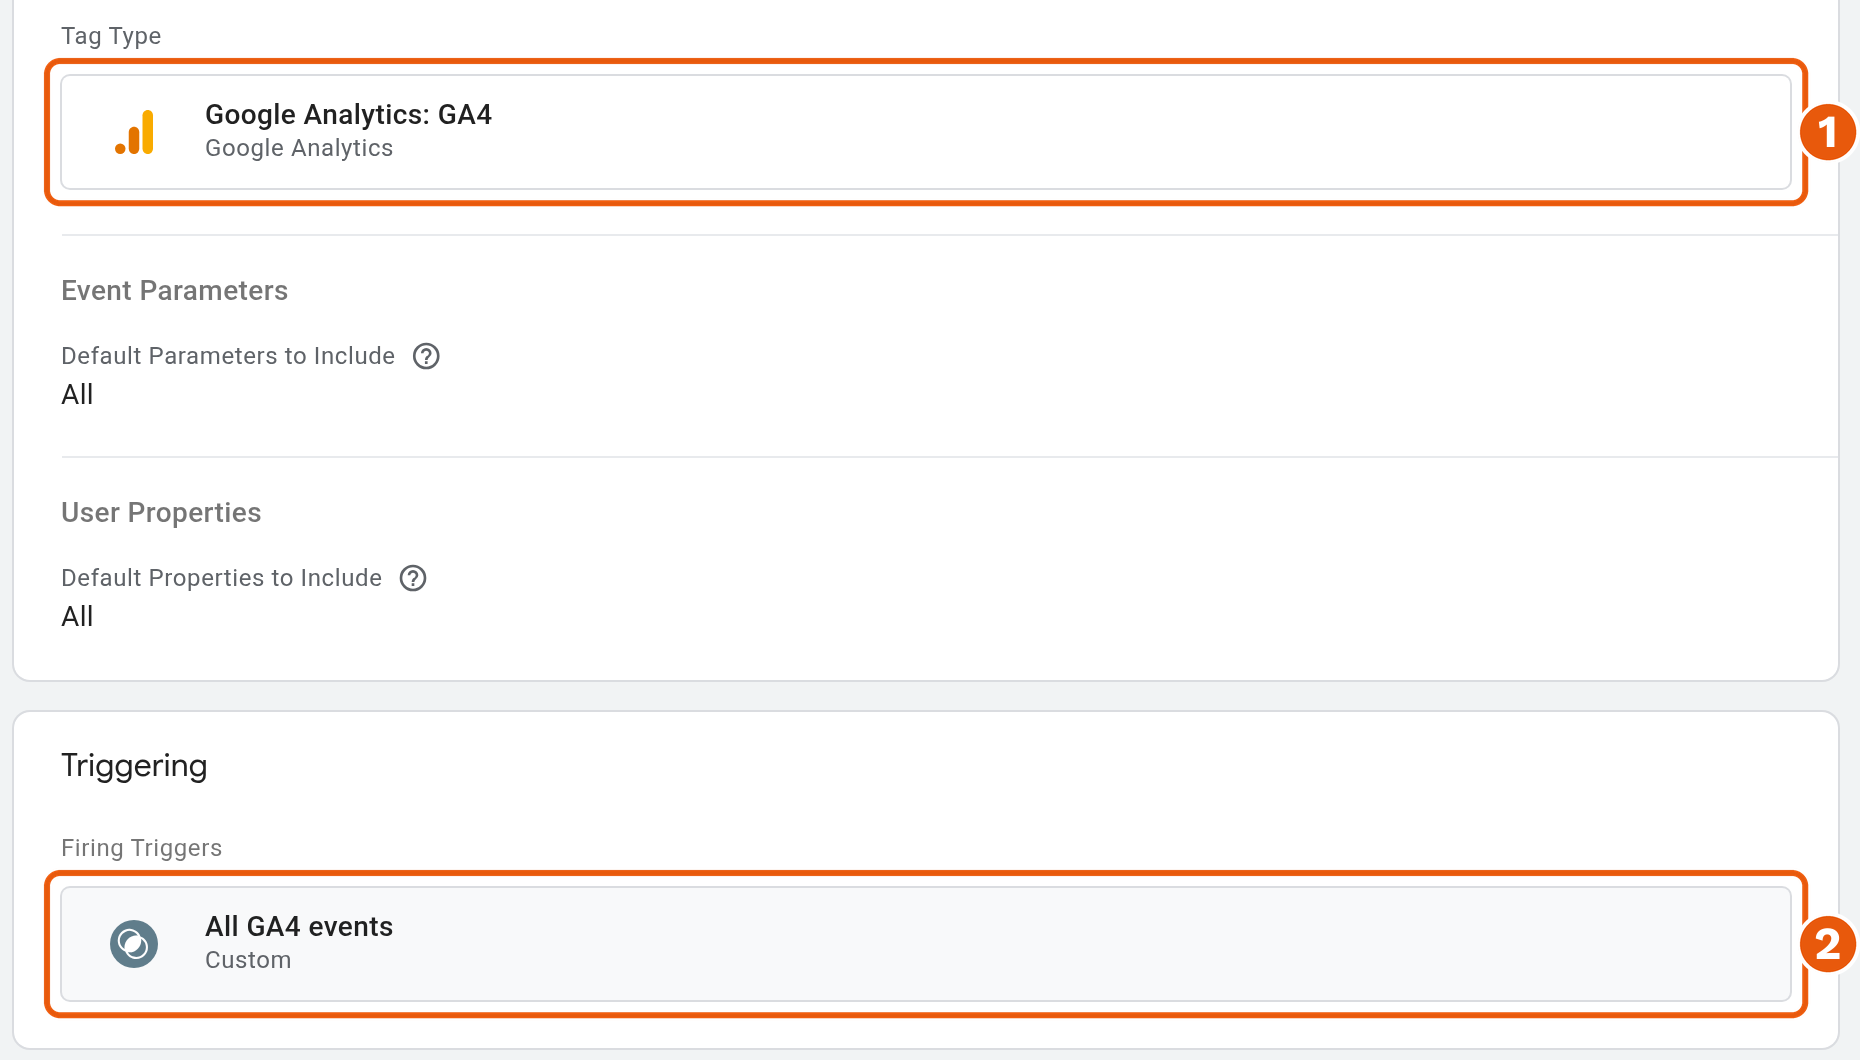
- Click Tags and New. Choose Google Analytics and Google Analytics: GA4. Leave the fields as they are.
- Choose the trigger from before under Triggering, give the tag a name, e.g. "GA4 - send to Google Analytics", and click Save.
The subdomain and publishing
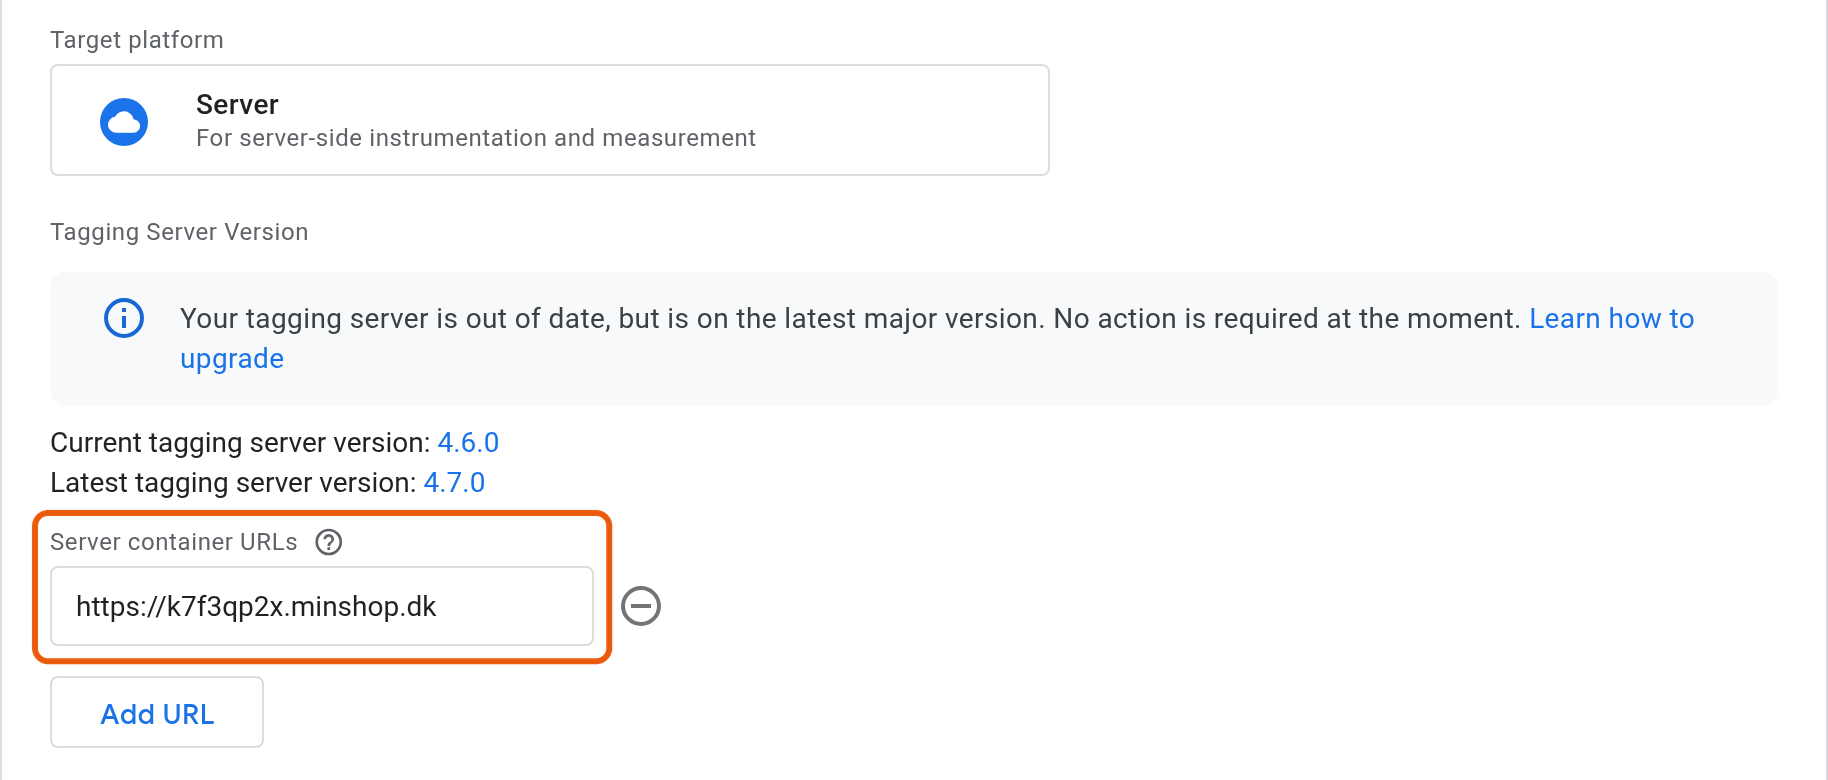
- Click Admin and Container Settings. Click Add URL under Server container URLs, enter
https://and your subdomain, and click Save.
- Click Submit, enter a name for the version, and click Publish.
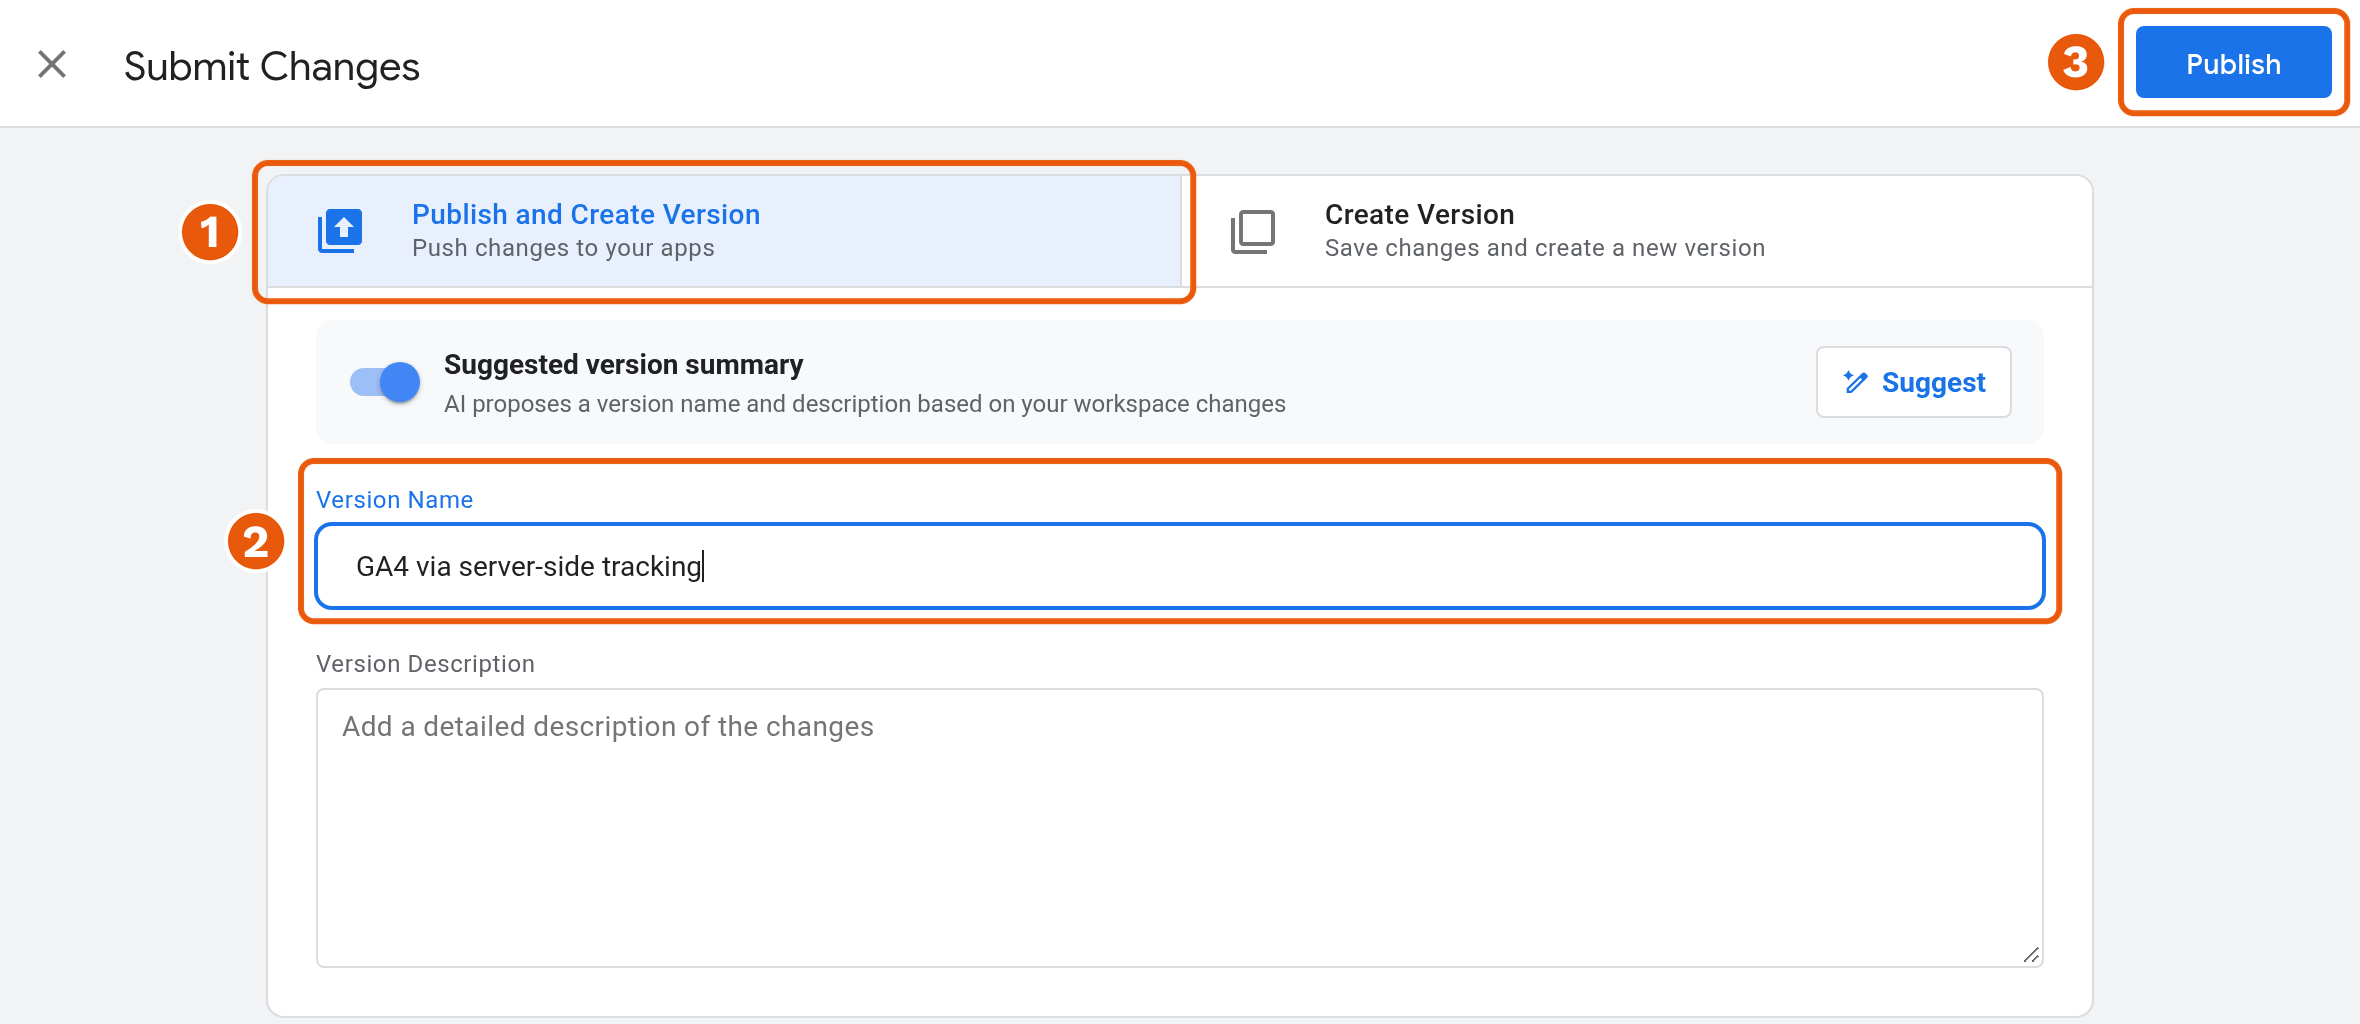
It can take up to a quarter of an hour before Stape uses the new version.
6. Tell Google Analytics about the subdomain
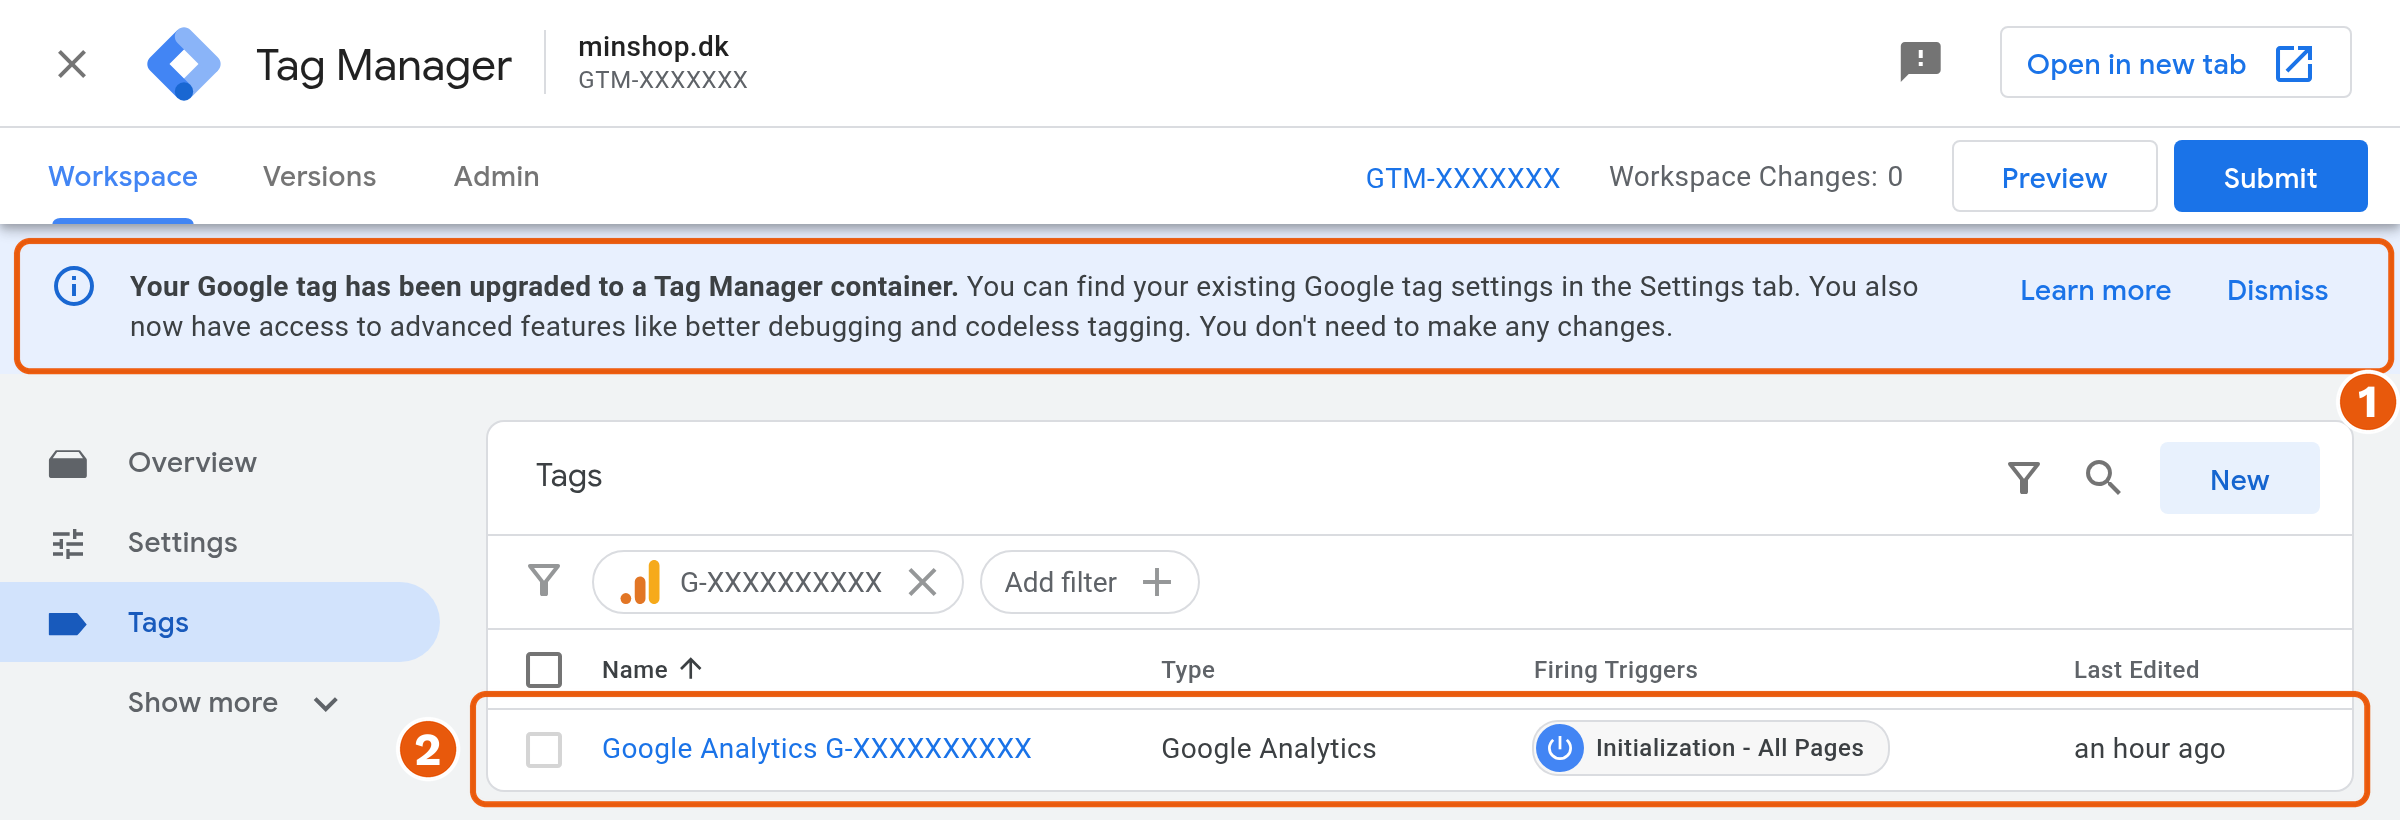
Google has started to "upgrade" Google tags to a Tag Manager container itself. If your tag has been upgraded, Google ignores the server address that the code in your online shop sends along, and data still goes directly to Google. This happened in our test shop, while an older tag in our demo shop worked without changes. This is how you see whether it applies to your tag, and fix it:
- Go to Admin > Data streams in Google Analytics, and click your web stream.
- Click Configure tag settings under Google tag further down the page. The panel opens.
- If it says "Your Google tag has been upgraded to a Tag Manager container", click Tags and open Google Analytics G-….
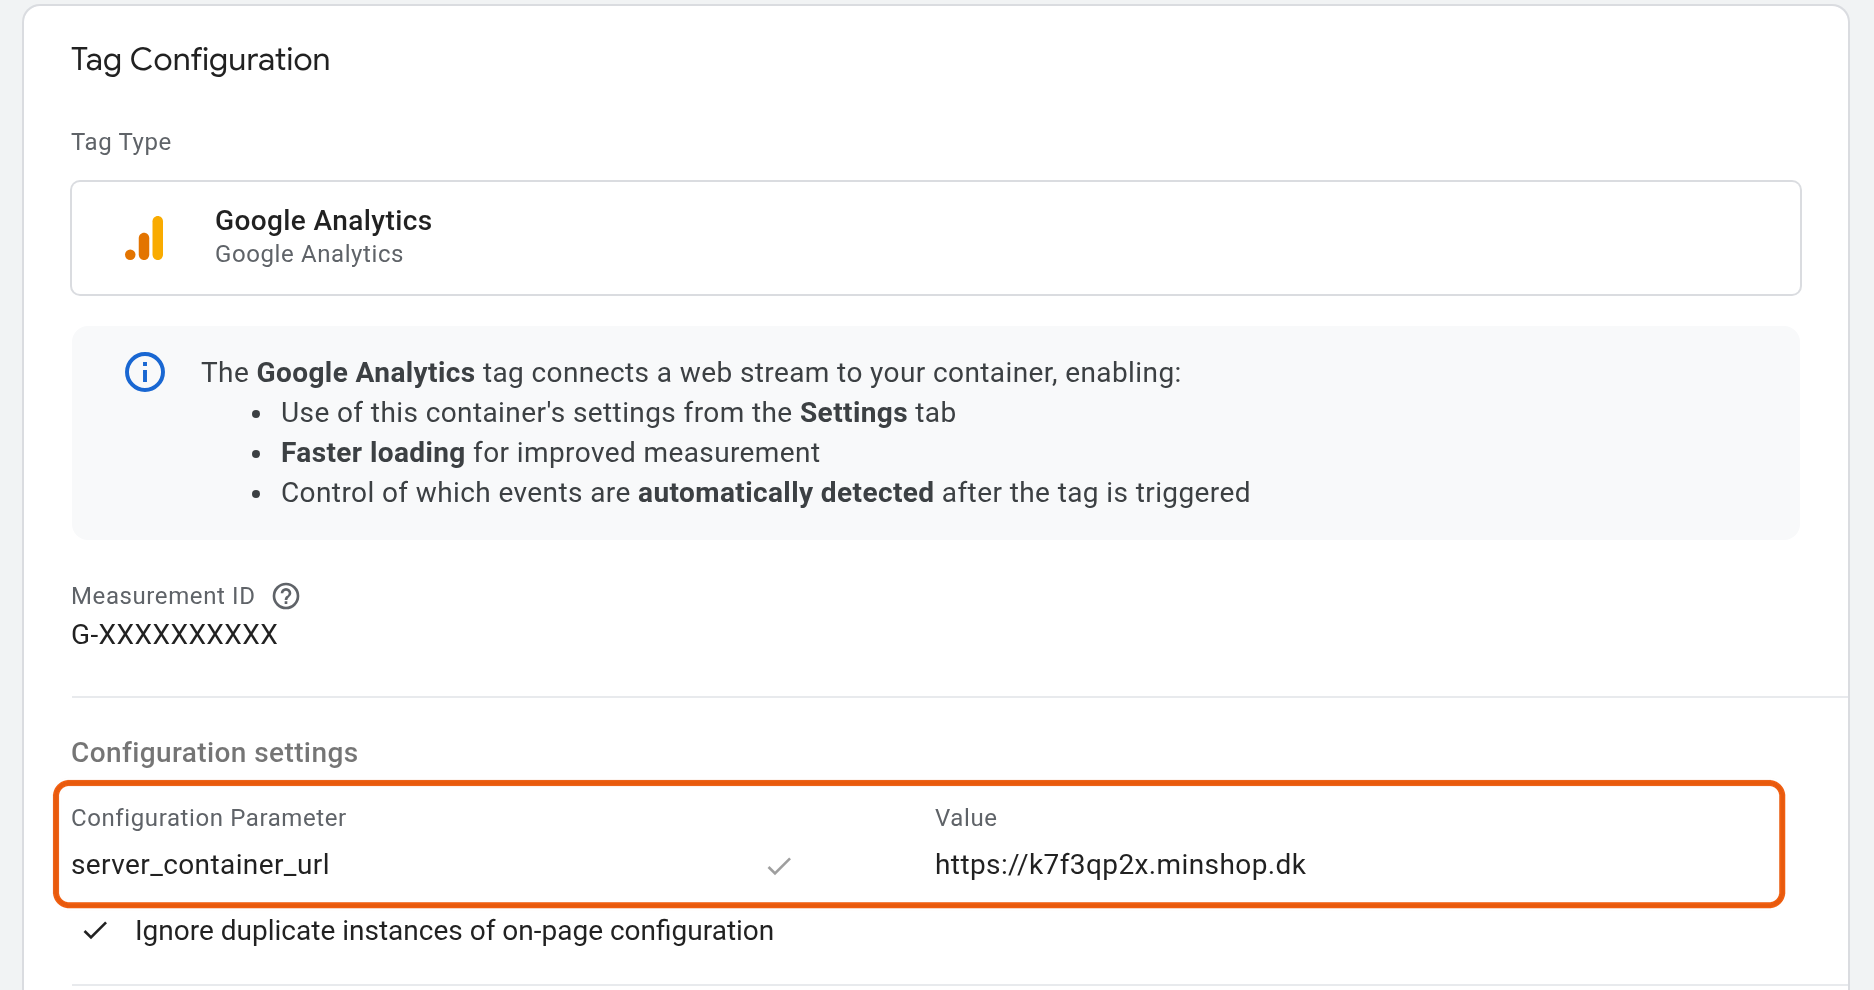
- Click Tag Configuration, and click Add parameter under Configuration settings. Enter
server_container_urlin the first field andhttps://plus your subdomain in the second. Click Save.
- Click Submit and Publish.
If it says nothing about an upgrade, you do not need to do anything here. Google then uses the server address from the code in step 7.
7. Add the server address to the code in your online shop
- Open the Google Analytics guide, and create the code again with your measurement ID. Enter your subdomain in the Server address field, e.g.
abc123.minshop.dk. - Replace the code in your integration under Integration > Custom Integration with the new code, and save.
The code now loads Google's code from your subdomain and sends every measurement there. Consent from your cookie banner works as before.
8. Check that it works
- Open your online shop in a private window, and say yes to cookies.
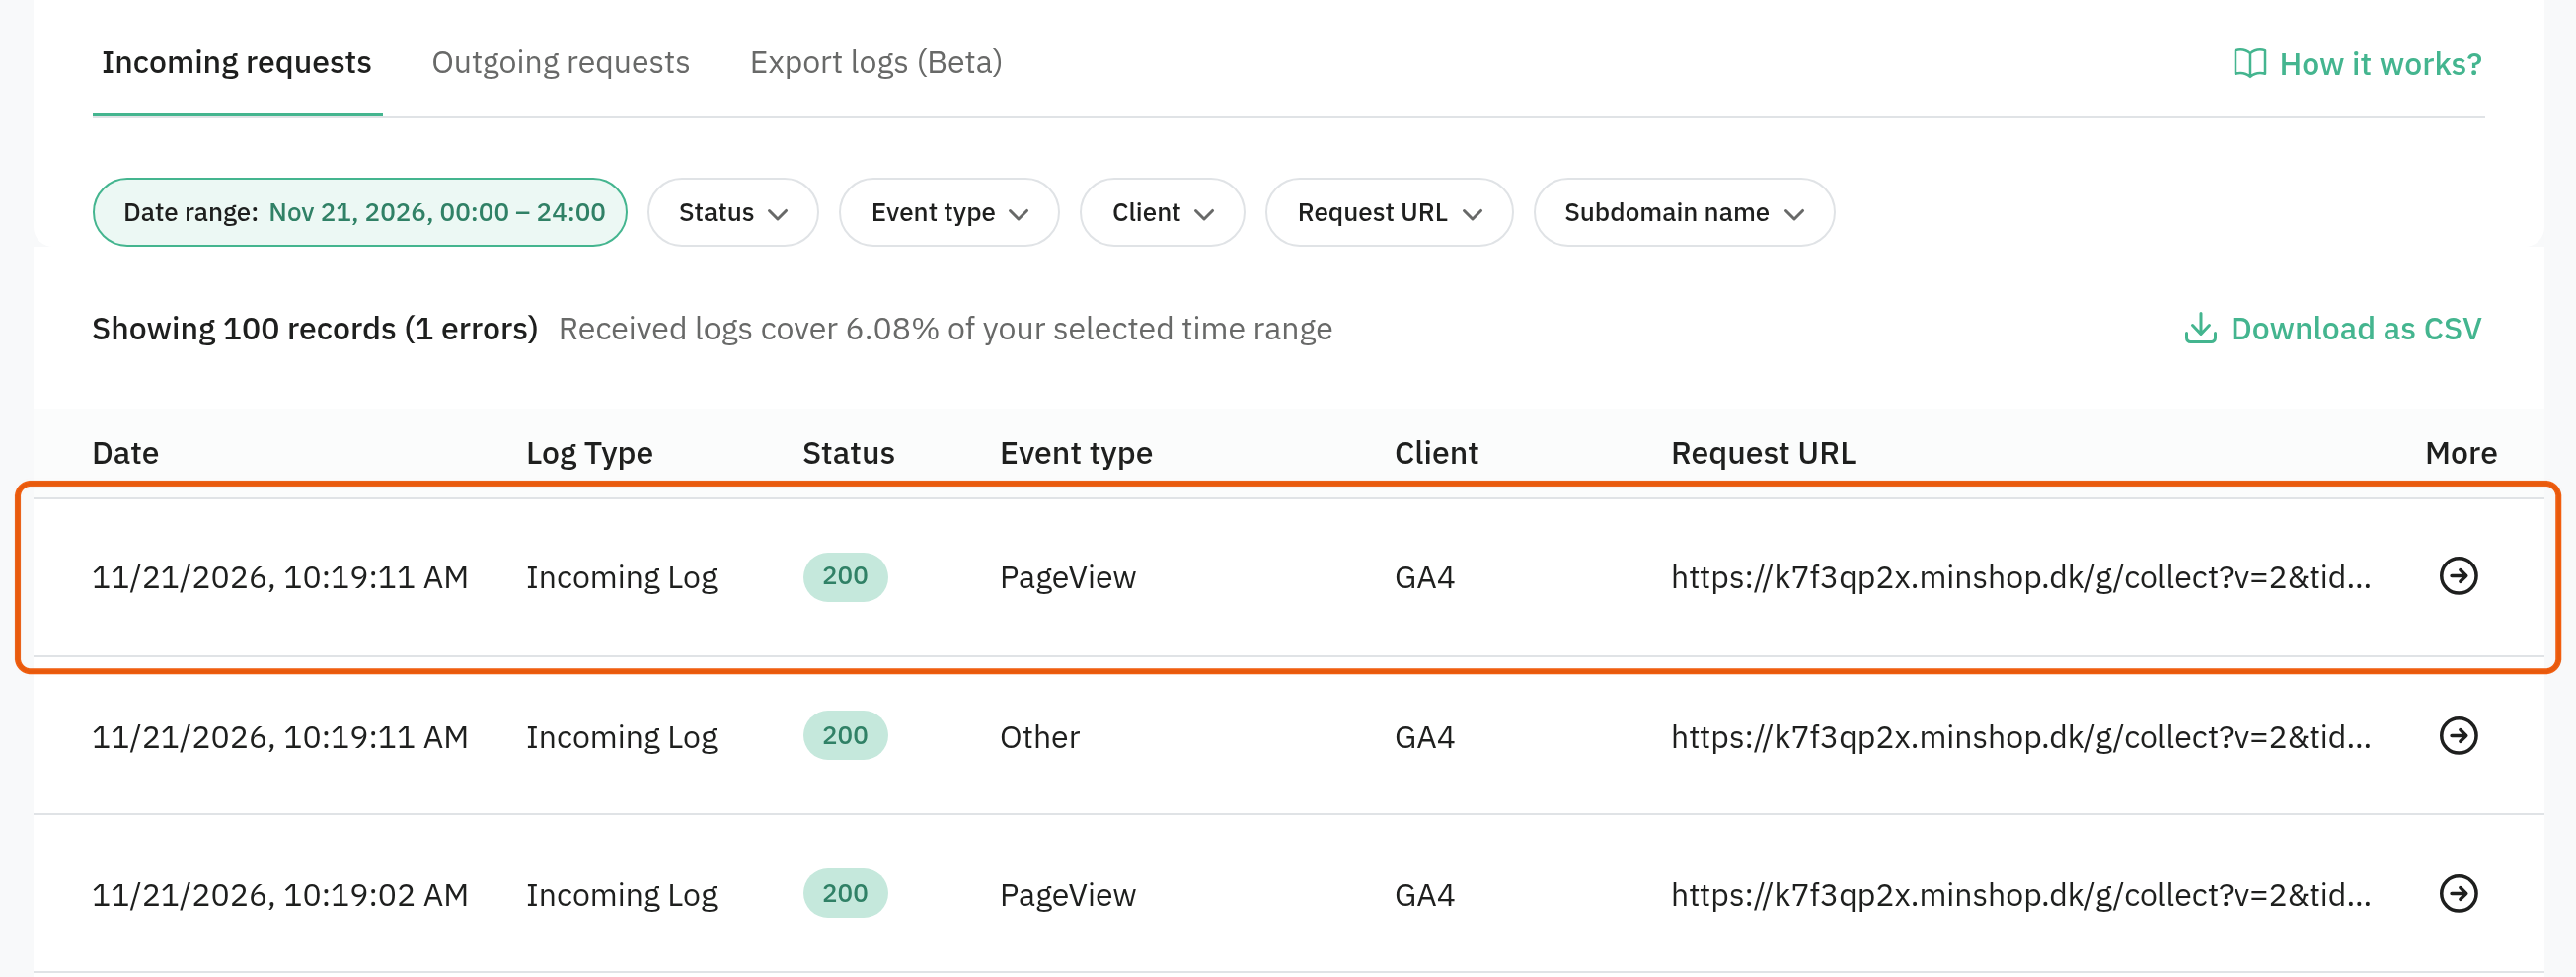
- Go to the Logs tab on the container at Stape. Here you should see new lines with
/g/collectand events such as PageView.
- Open Reports > Realtime overview in Google Analytics. Your visit should appear there after a minute or two.
We also tested that consent comes along: before an answer and after a no, only anonymous measurements without cookies arrive, and if the visitor withdraws their yes, the Google cookies disappear.
Good to know
- Facebook and Google Ads: Leave the Facebook Conversions API in the online shop and the built-in Google Ads conversion as they are. Do not also set up a Meta tag or a Google Ads tag in the server container, because then everything is counted twice.
- Cookies for the whole domain: The shop's cookies that apply to the whole domain, e.g. the basket's ID, are also sent to the subdomain. Stape's log does not keep them.
- Stape's other features: Cookie Keeper only works together with Custom Loader, which we chose not to use. Bot Detection marks requests from bots, but only blocks at a very high score. We have not used them.
- If you change your mind: Create the code again without a server address, and remove
server_container_urlfrom the Google tag if you added it there. Otherwise data still goes to the subdomain.