
In this category Other topics
CookieYes: free cookie banner
Set up CookieYes as the cookie banner in your Golden Planet online shop: create a free account, add the code, and make Google Analytics, the Meta pixel and the shop's own cookies follow each visitor's choice.
On this page
Your online shop must ask visitors before it sets cookies for statistics and marketing. Google also requires the answer before Google Analytics and Google Ads can make full use of visitors from the EU. A cookie banner takes care of this.
Cookiebot and Cookie Information are the most widely used in Denmark (see Cookie banner solutions). CookieYes is a cheaper alternative: free for small shops and €9 a month for Basic.
We set up CookieYes in our own test shop and tested it with our code for Google Analytics and the Facebook Pixel. This guide follows that setup, including the places where CookieYes did not do the right thing by itself.
Free or Basic
The free plan covers 5,000 page views a month, a log of consents and Google Consent Mode v2. The banner can have one language, and you can have one free shop per account.
5,000 page views sounds like a lot, but 1,000 visitors who each see five pages use them all.
When the limit is reached, CookieYes switches your banner off until you choose a paid plan. Visitors are then no longer asked. How many you have used is shown at the top of CookieYes under Pageviews used.
Basic costs €9 a month or €90 a year per shop, excluding VAT. It covers 100,000 page views a month, and the banner can be shown in several languages. The prices are from CookieYes' pricing page (opens in a new tab) on 20 November 2026.
Our advice: create a free account as described below. If you have more than 5,000 page views a month, or you sell in several languages, choose Basic.
To start Basic, click Start free trial under Basic on the pricing page. The form is the same as for the free account, but the heading is Start Your 14 Day Free Trial, and it says the price is €9 a month after 14 days. Read CookieYes' terms for the trial before you start it.
Create a free account
-
Go to CookieYes' page for a free account (opens in a new tab).
Tip: The Try for free and Get started for free buttons on CookieYes' front page start a trial of the Pro plan, which costs $25 a month afterwards. Use the link here instead.
-
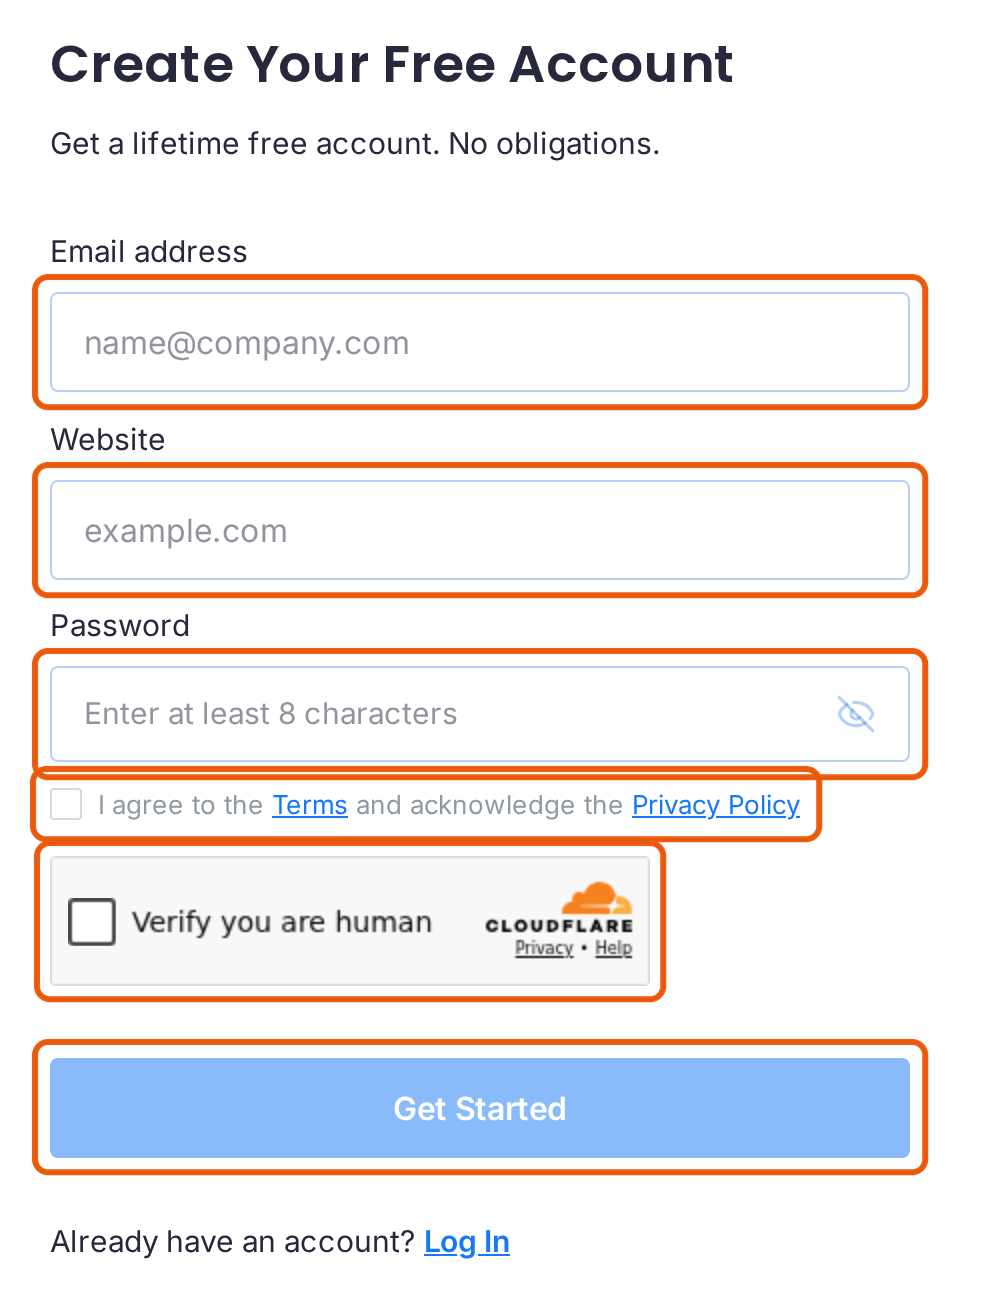
Enter your email under Email address, your shop's address under Website (e.g. minshop.dk) and a password under Password.
-
Tick I agree to the Terms and acknowledge the Privacy Policy and Verify you are human, and click Get Started.
-
CookieYes sends you an email. Click the link in it to confirm your address.
Choose the language and look
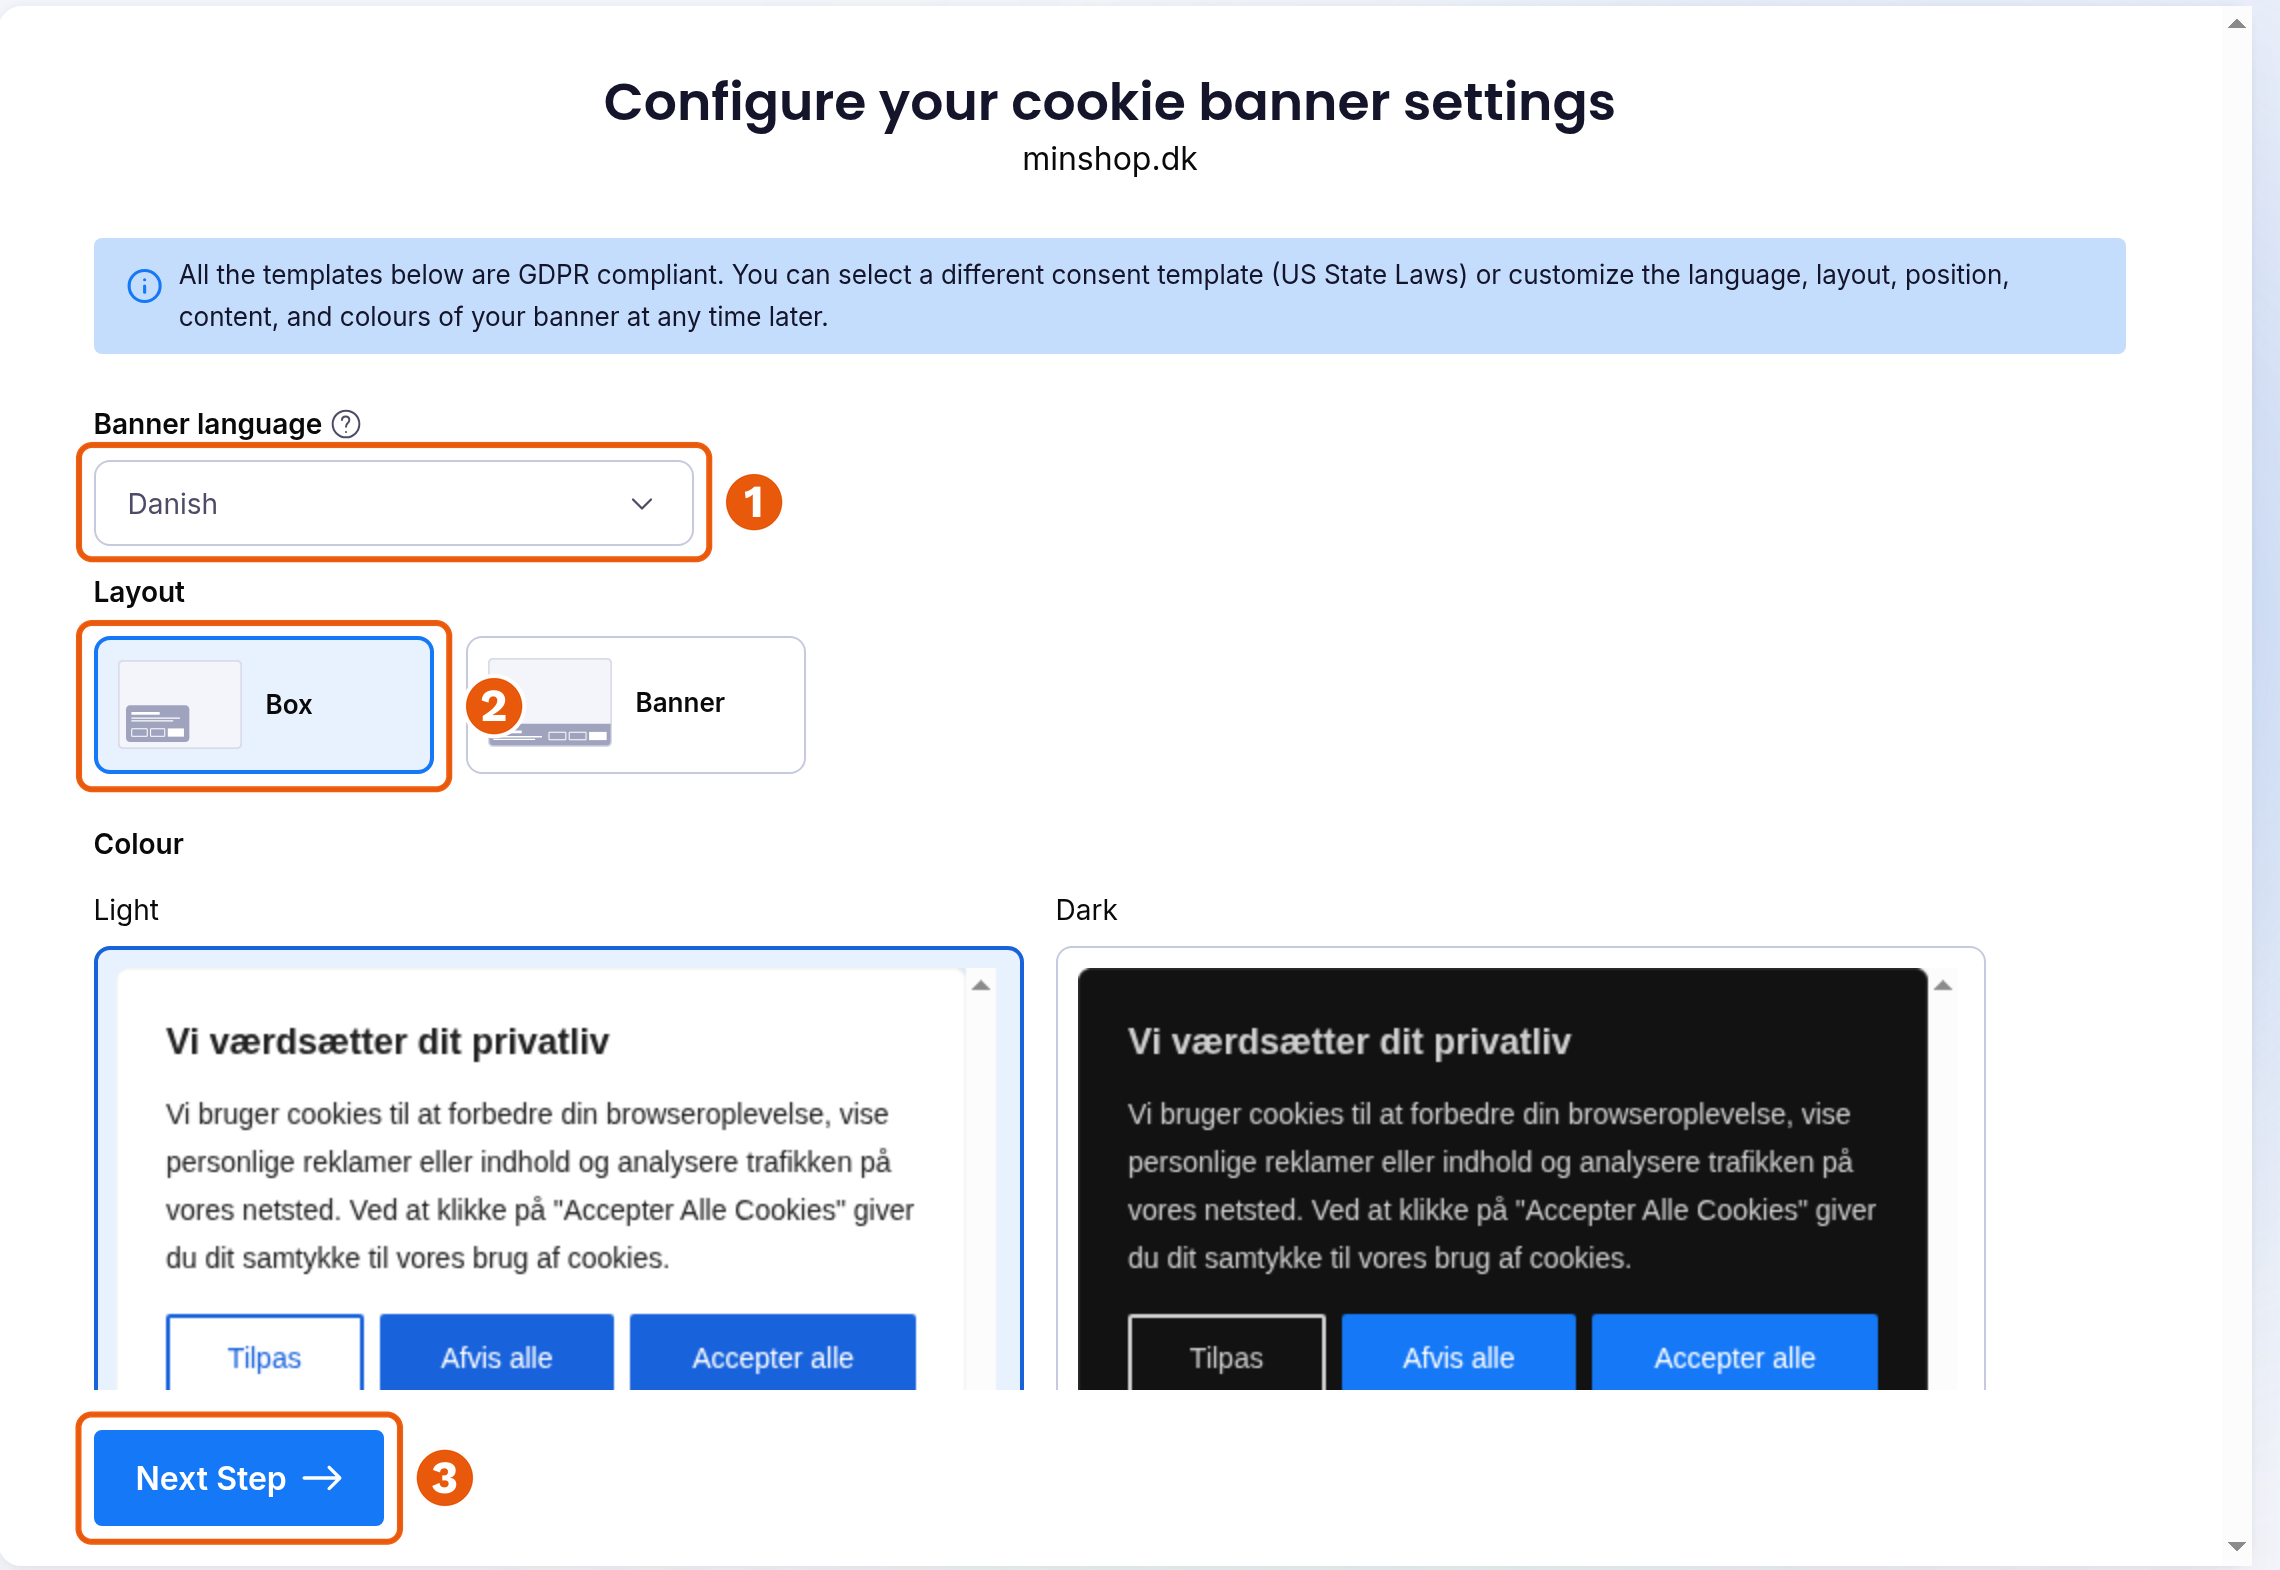
Once the account is created, you come to the page Configure your cookie banner settings.
-
Choose your shop's language under Banner language, e.g. Danish.
-
Choose Box under Layout. Choose a colour under Colour, and click Next Step.
-
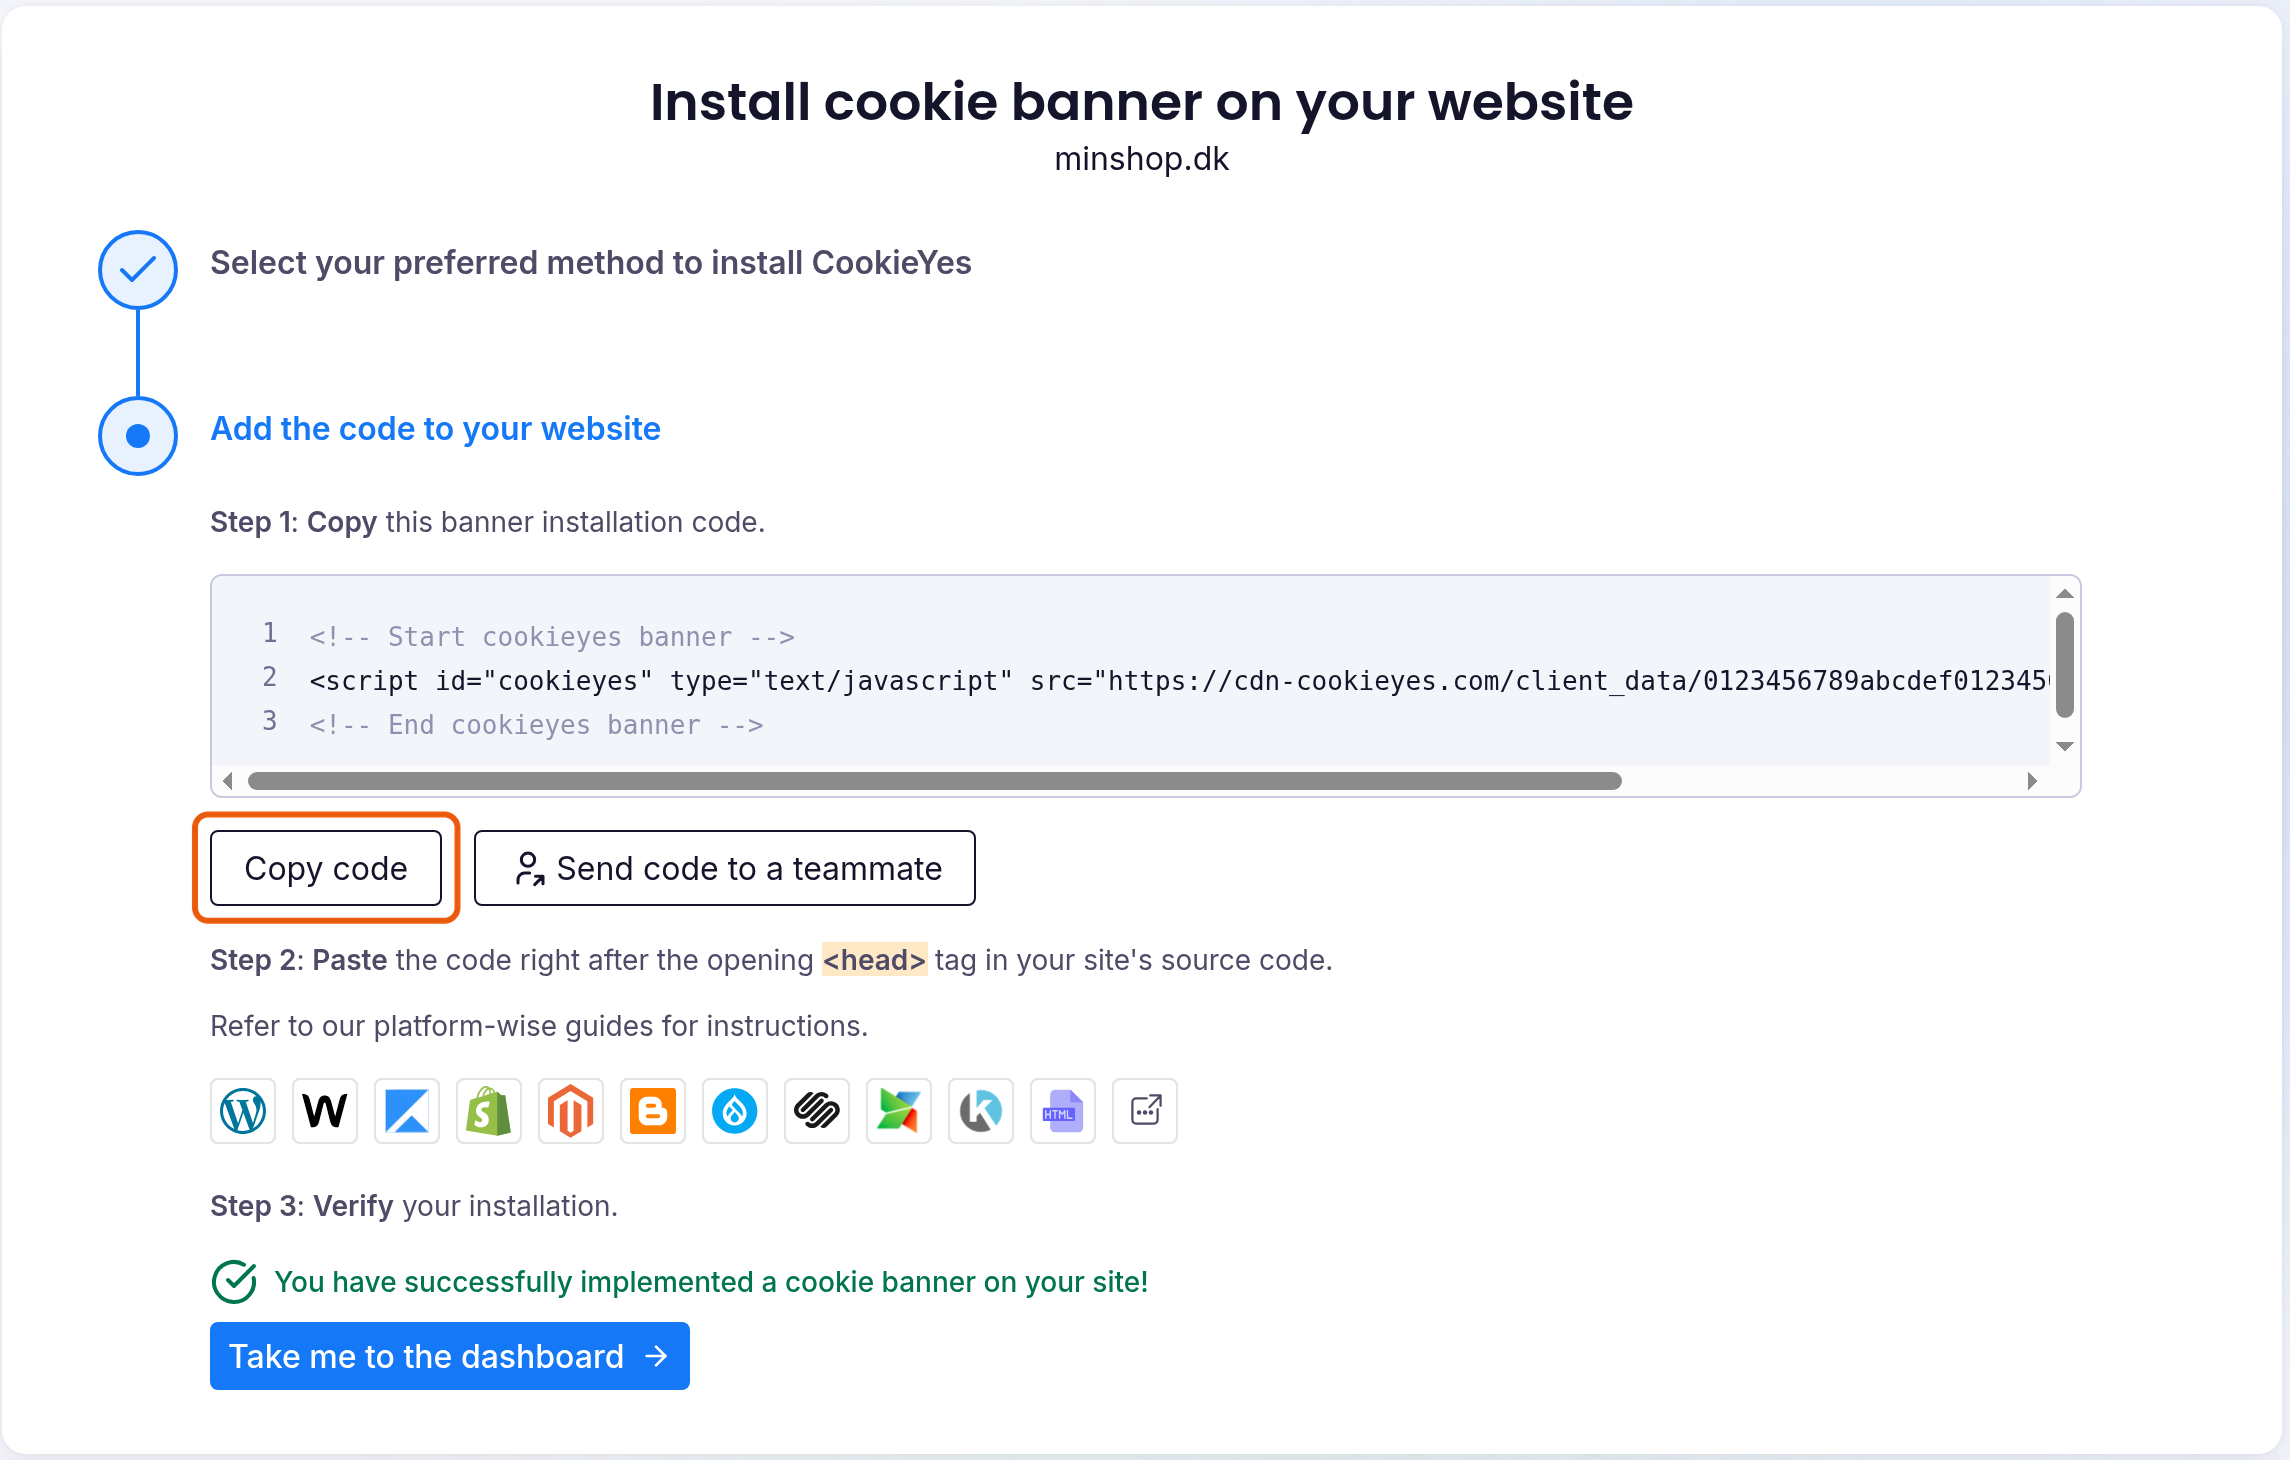
Click Install manually on website, and click Copy code. Leave the page open. You will go back to it once the code is in place.
Add the code to your shop
The code from CookieYes and Golden Planet's add-on go in together, in one integration under Custom Integration.
-
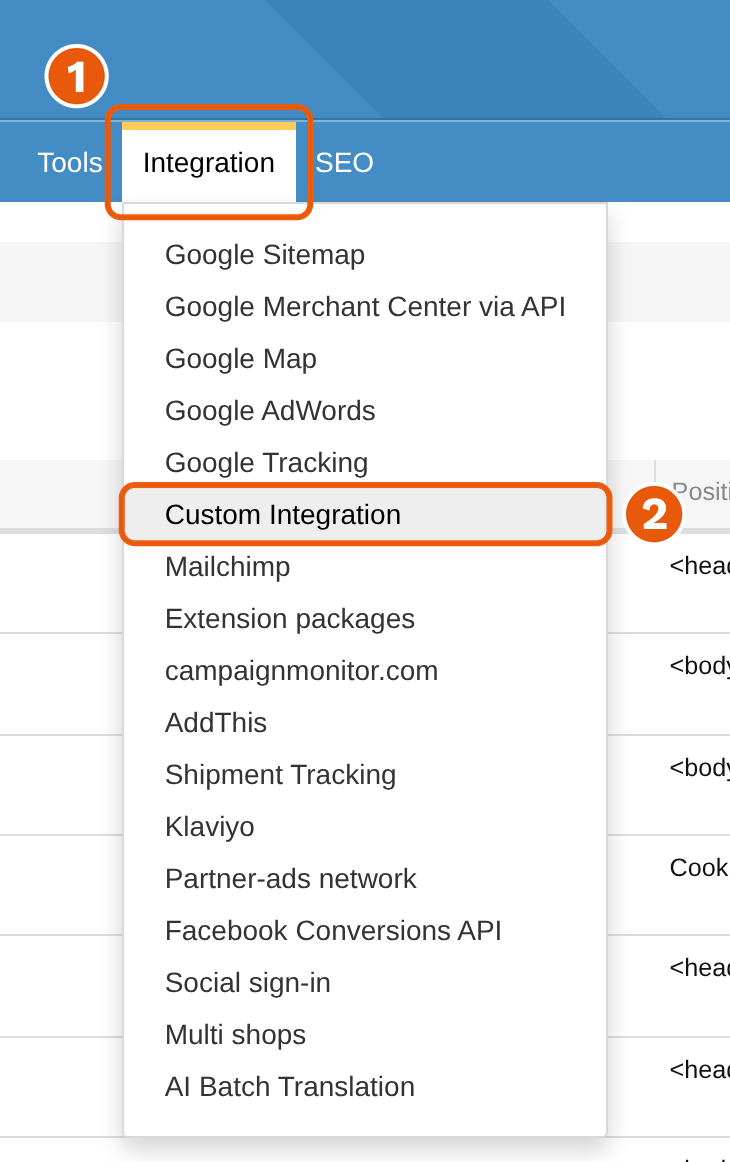
In your shop's admin, go to Custom Integration under Integration.
-
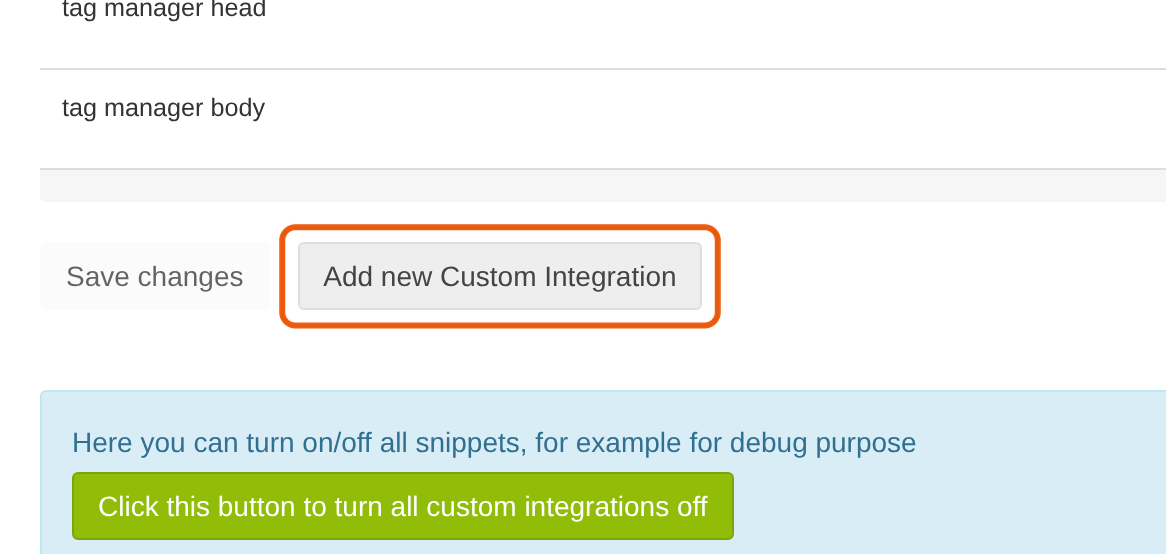
Click the Add new Custom Integration button below the list.
-
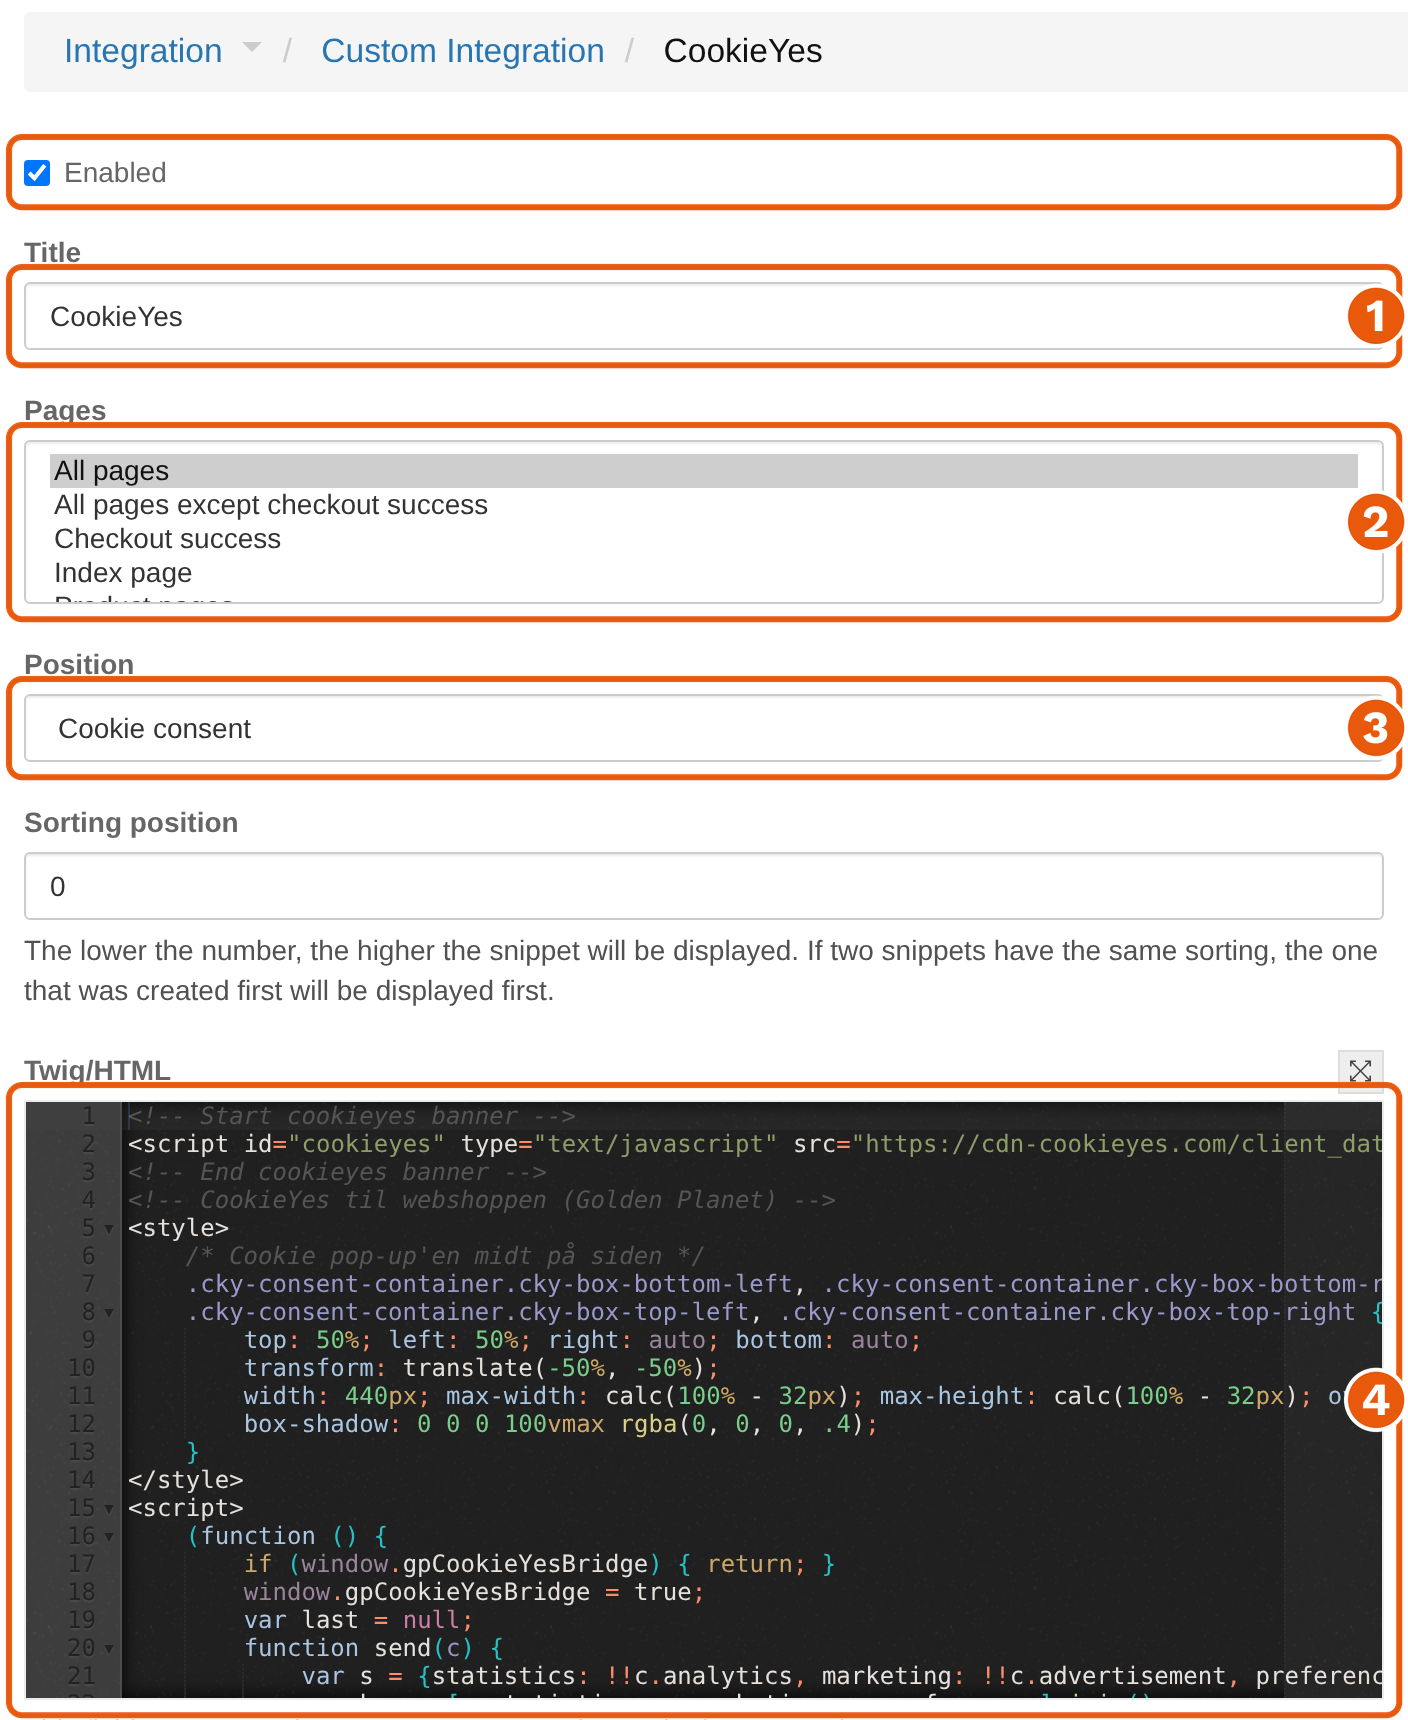
Make sure Enabled is ticked. Enter CookieYes as the Title. Choose All pages under Pages and Cookie consent under Position.
Tip: Cookie consent puts the code before all other code in the shop. That gives CookieYes time to hold other scripts back until the visitor has answered.
-
Paste the code from CookieYes into the Twig/HTML field.
-
Click Copy the code in the tool below. Paste the code on a new line directly below the code from CookieYes, and click Save.
Golden Planet's add-on for CookieYes
The same code for every online shop. It goes directly below the code from CookieYes.
The code is the same for everyone. You do not need to change anything.
Copy the code below as it is.
The code will appear here.
<!-- CookieYes til webshoppen (Golden Planet) -->
<style>
	/* Cookie pop-up'en midt på siden */
	.cky-consent-container.cky-box-bottom-left, .cky-consent-container.cky-box-bottom-right,
	.cky-consent-container.cky-box-top-left, .cky-consent-container.cky-box-top-right {
		top: 50%; left: 50%; right: auto; bottom: auto;
		transform: translate(-50%, -50%);
		width: 440px; max-width: calc(100% - 32px); max-height: calc(100% - 32px); overflow-y: auto;
		box-shadow: 0 0 0 100vmax rgba(0, 0, 0, .4);
	}
</style>
<script>
	(function () {
		if (window.gpCookieYesBridge) { return; }
		window.gpCookieYesBridge = true;
		var last = null;
		function send(c) {
			var s = {statistics: !!c.analytics, marketing: !!c.advertisement, preferences: !!c.functional};
			var key = [s.statistics, s.marketing, s.preferences].join();
			if (key === last) { return; }
			var sent = false;
			// Google og Meta først: GA4-koden lytter også på obb.consent.update (kun statistik)
			if (typeof window.gpGa4Consent === 'function') {
				window.gpGa4Consent({statistics: s.statistics, marketing: s.marketing});
				sent = true;
			}
			if (typeof window.gpMetaPixelConsent === 'function') {
				window.gpMetaPixelConsent(s.marketing);
				sent = true;
			}
			if (window.obb && window.obb.consent && typeof window.obb.consent.update === 'function') {
				window.obb.consent.update({statistics: s.statistics, preferences: s.preferences});
				sent = true;
			}
			if (sent) { last = key; }  // not yet loaded: the next event or DOMContentLoaded tries again
		}
		function read() {
			var c = typeof window.getCkyConsent === 'function' ? window.getCkyConsent() : null;
			if (c && c.isUserActionCompleted && c.categories) { send(c.categories); }
		}
		document.addEventListener('cookieyes_banner_load', read);
		document.addEventListener('cookieyes_consent_update', function (e) {
			var a = (e.detail && e.detail.accepted) || [];
			send({analytics: a.indexOf('analytics') >= 0, advertisement: a.indexOf('advertisement') >= 0, functional: a.indexOf('functional') >= 0});
		});
		if (document.readyState === 'loading') { document.addEventListener('DOMContentLoaded', read); } else { read(); }

		// Et link til #cookie-indstillinger (eller #cookie-settings) åbner cookie-indstillingerne igen
		var settings = /#cookie-(indstillinger|settings)$/;
		function openSettings() {
			if (typeof window.revisitCkyConsent === 'function') { window.revisitCkyConsent(); return true; }
			return false;
		}
		document.addEventListener('click', function (e) {
			var a = e.target && e.target.closest ? e.target.closest('a[href]') : null;
			if (a && settings.test(a.getAttribute('href')) && openSettings()) { e.preventDefault(); }
		});
		document.addEventListener('cookieyes_banner_load', function () {
			if (settings.test(location.hash)) { openSettings(); }
		});
		window.addEventListener('hashchange', function () {
			if (settings.test(location.hash)) { openSettings(); }
		});
	})();
</script>
Golden Planet's add-on does three things:
- It passes the visitor's answer on to our code for Google Analytics and the Meta pixel, and to the shop's own statistics cookies. CookieYes cannot tell them by itself.
- It shows the banner in the middle of the page with a dark background. Otherwise CookieYes shows it at the bottom left, and their own banner in the middle requires the Pro plan.
- A link to
#cookie-indstillingeropens the cookie settings again. This is explained in the section on the link below.
Go back to CookieYes and click Verify. If it says You have successfully implemented a cookie banner on your site!, the code is in place. Click Take me to the dashboard.
Let Google Analytics measure before the answer
Our code for Google Analytics uses what Google calls Advanced Consent Mode: before the visitor has answered, it sends events without cookies, which Google uses to estimate the visits it cannot see directly.
From the start, CookieYes holds the Google code back completely until the visitor has said yes. Then nothing is sent before the answer, and the code works as Basic Consent Mode. We saw this in our test shop.
-
Go to Advanced Settings in CookieYes.
-
Under Google consent mode (GCM), Support GCM must be switched on. Switch on Allow Google tags to fire before consent. It is saved straight away.

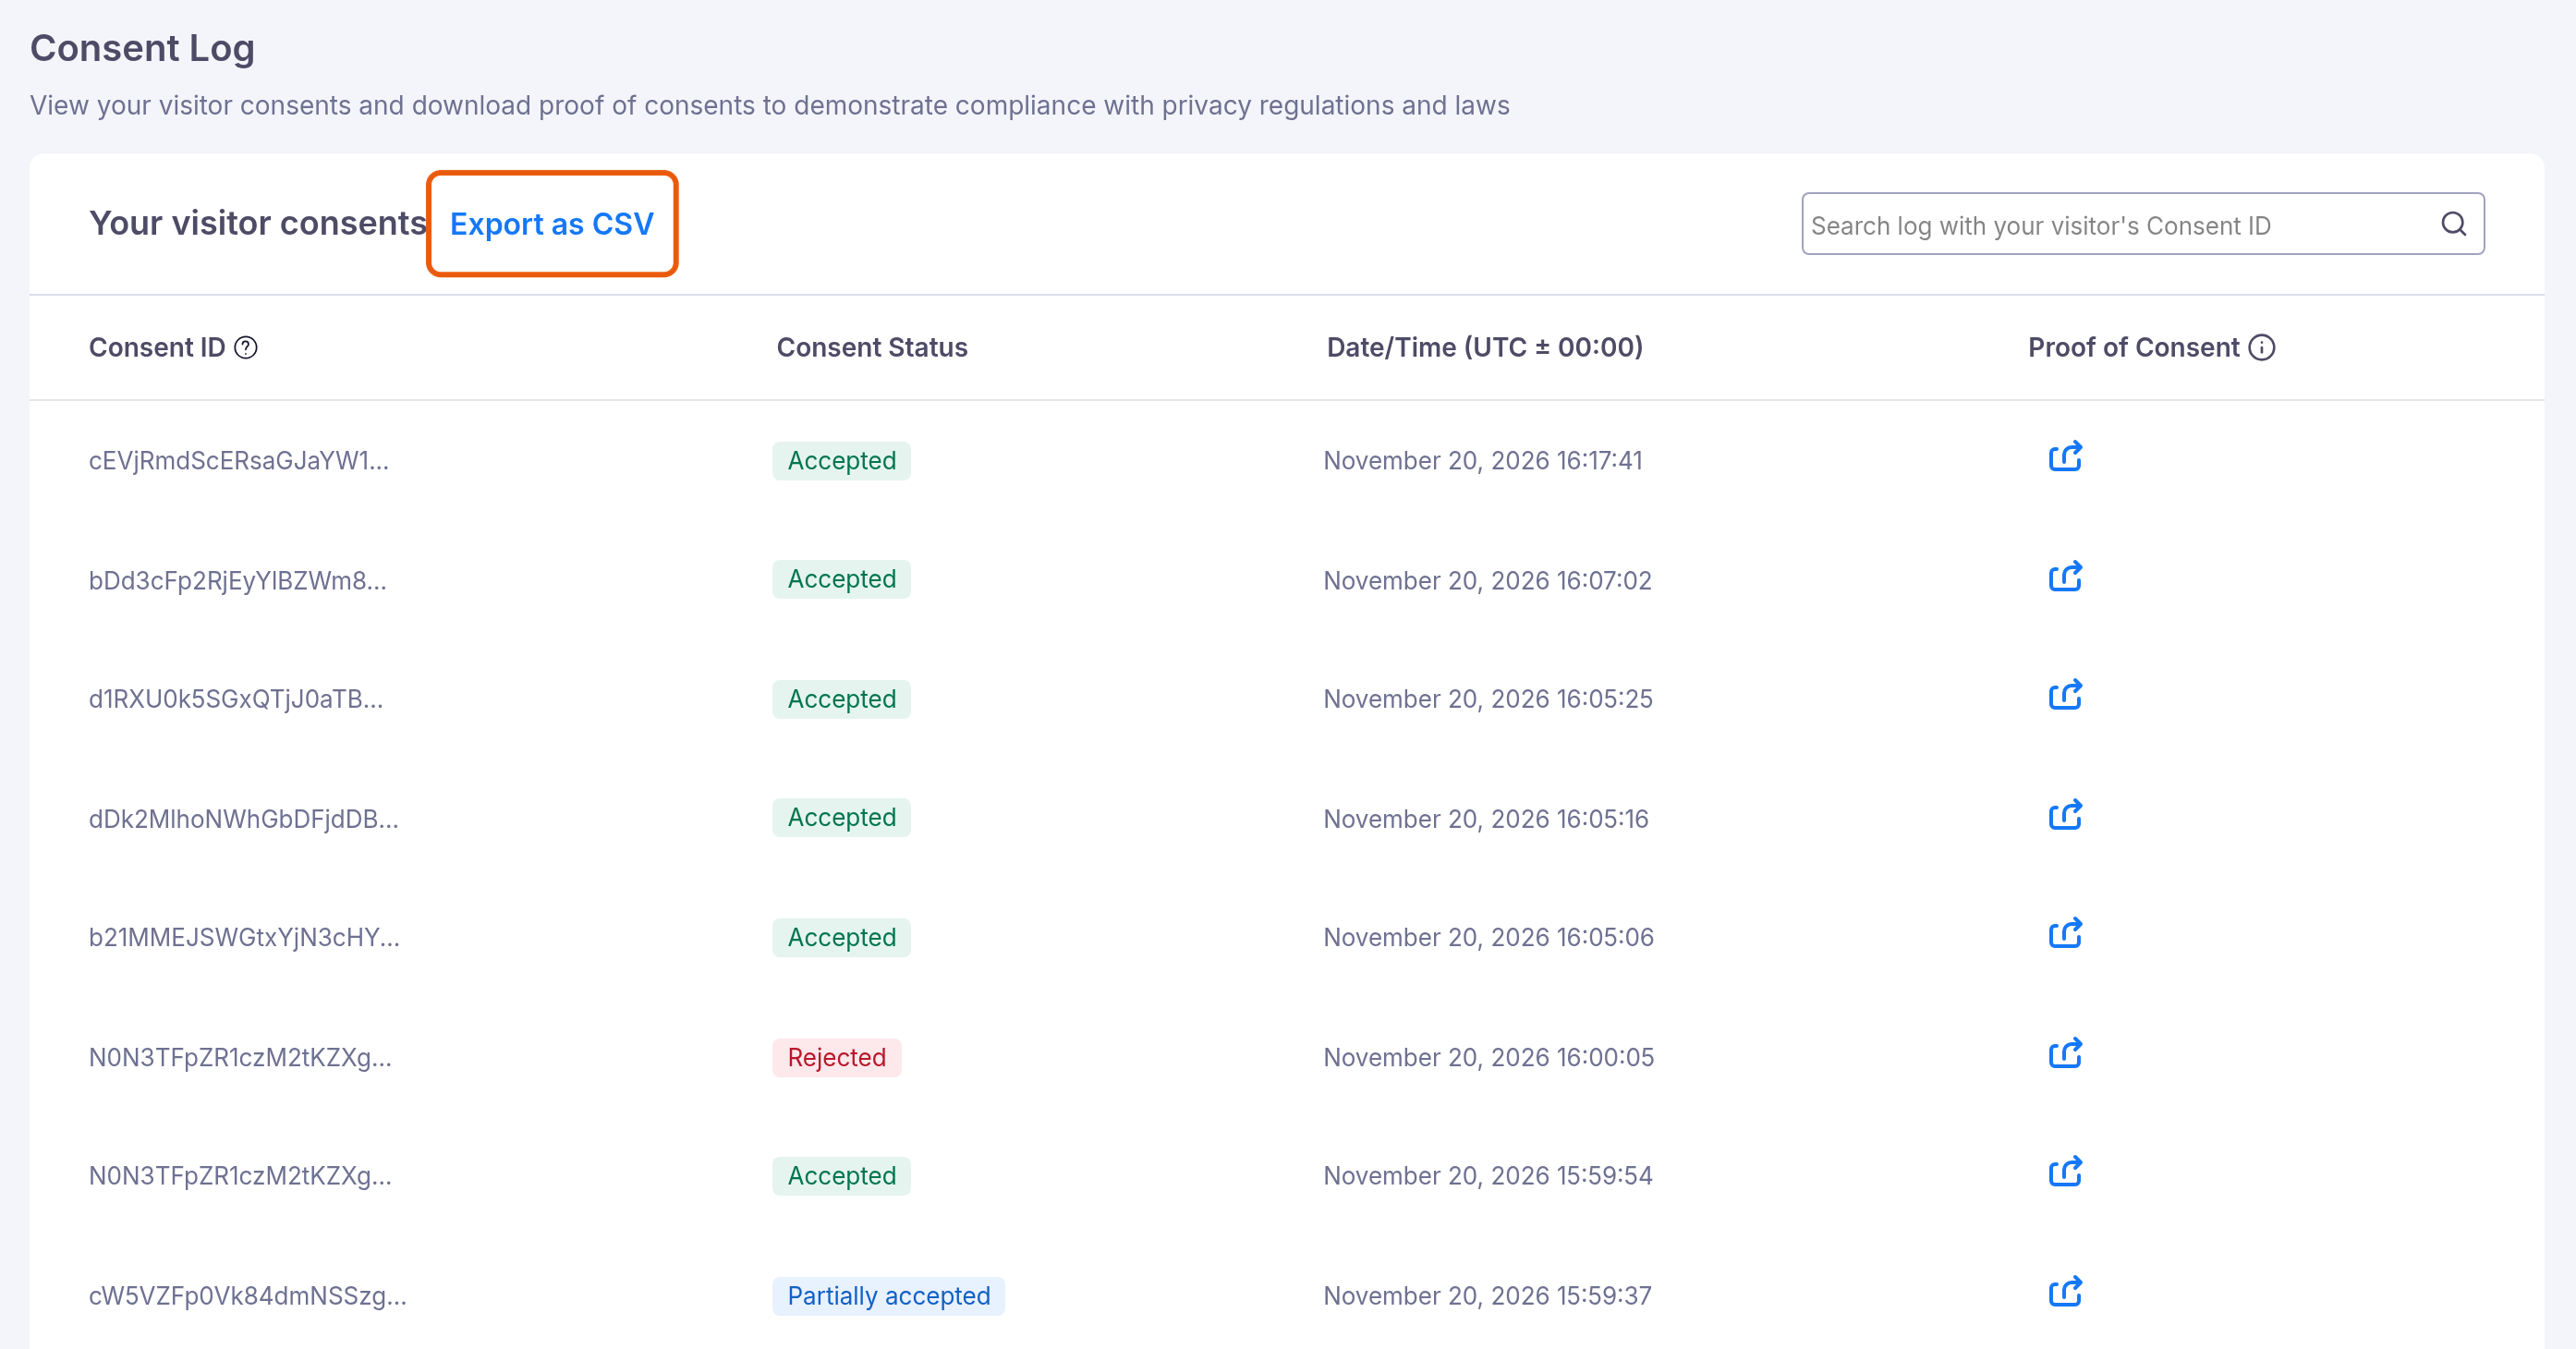
On the same page, Consent log is switched on from the start. Leave it on. The log is your proof of what each visitor answered.
Remove the small button in the corner
After an answer, CookieYes shows a small round button at the bottom of the page all the time. With it the visitor can change their choice, but it takes up space on the screen, especially on mobile.
-
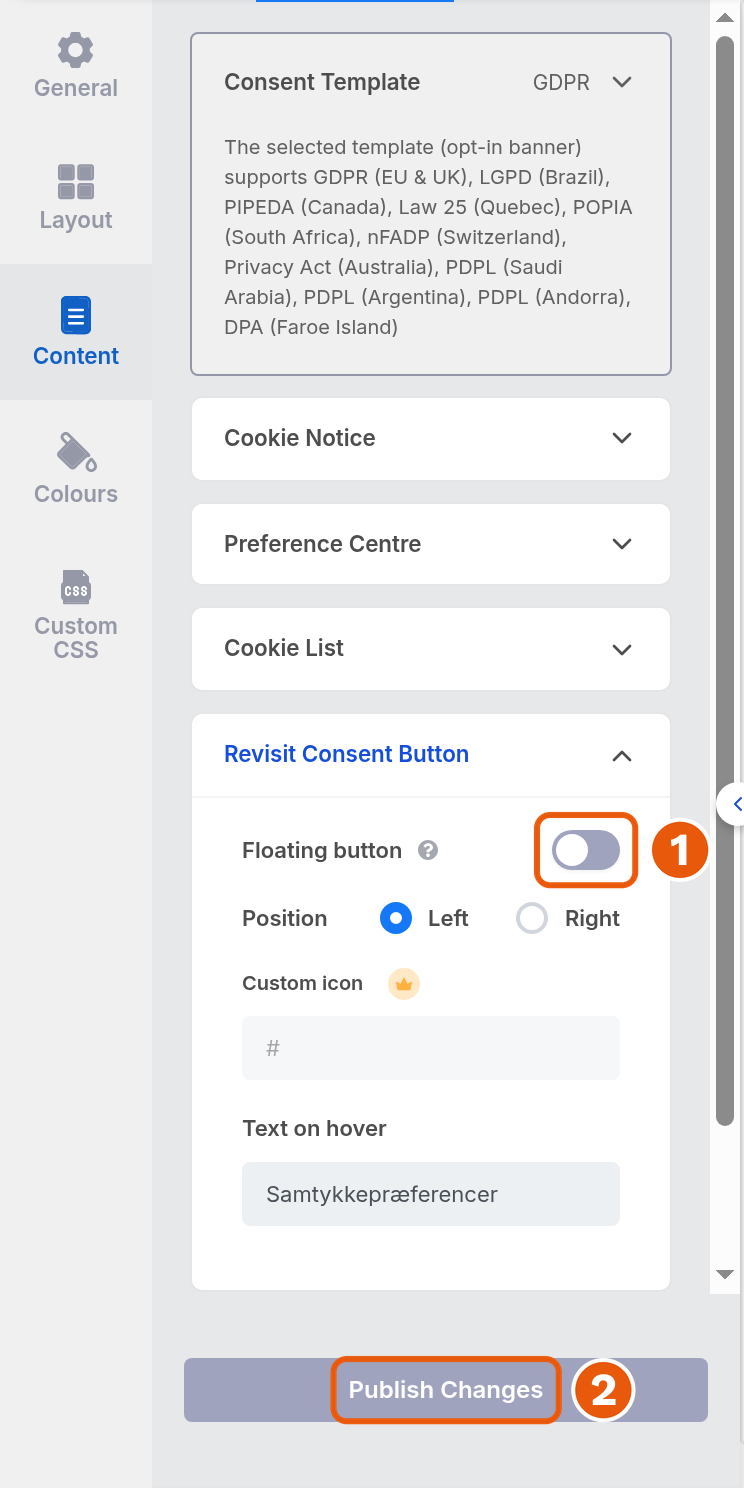
Go to Cookie Banner in CookieYes, and choose Content on the left.
-
Open Revisit Consent Button, and switch Floating button off.
-
Click Publish Changes.
Add a link to the cookie settings
It must be as easy for the visitor to take back a yes as to give it. Without the button in the corner, there must therefore be a link somewhere else, for example in your privacy policy.
-
Go to Info Pages under Content & layout, and open your privacy policy.
-
Write, for example, "Cookie settings" in the text, select the words, and make them a link with the address
#cookie-indstillinger. Click Save.
When a visitor clicks the link, Golden Planet's add-on opens CookieYes' cookie settings. The link also works if the address has your domain in front, e.g. https://minshop.dk/#cookie-indstillinger, and #cookie-settings works too.
Go through the cookies in CookieYes
CookieYes scans your shop and makes a list of the cookies it finds. The free plan scans up to 100 pages at a time and 5 times a month.
The shop's own cookies
The shop's own cookies have names with _gpp. CookieYes does not know them and puts them under Ukategoriserede (uncategorised). Move them to the right category. Afterwards CookieYes shows a warning triangle next to the categories, because the cookies have no Script URL Pattern. That is expected: the shop controls its own cookies itself (the section on statistics cookies below).
-
Go to Cookie Manager in CookieYes.
-
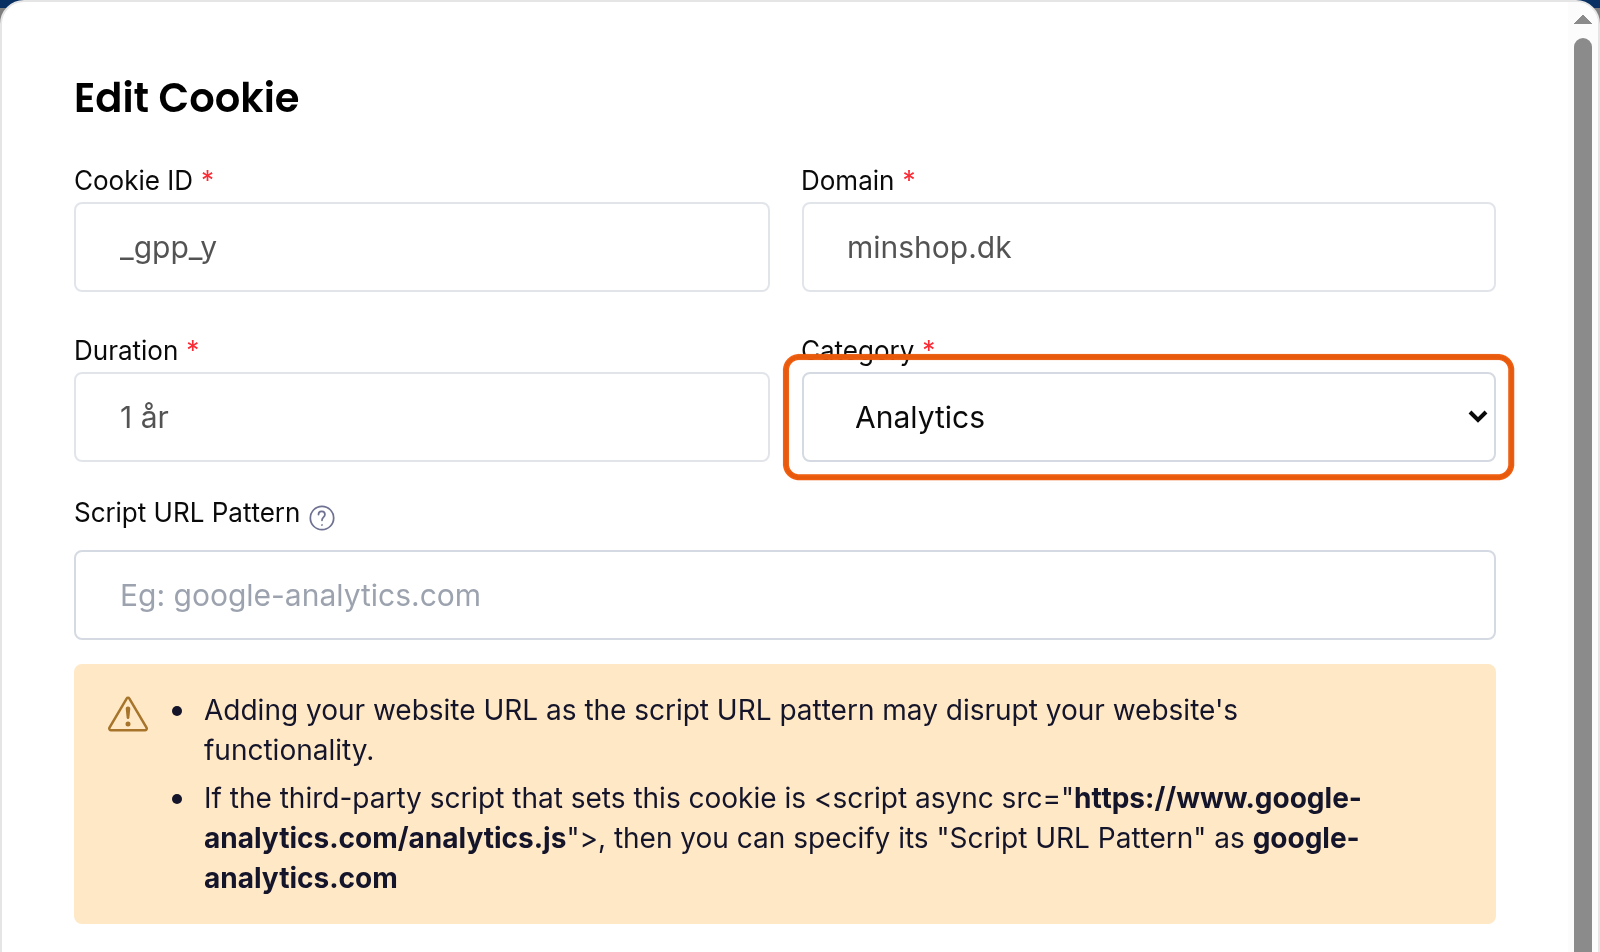
Click the three dots next to a cookie, and choose Edit cookie.
-
Choose the category under Category, write a short description in your banner's language under Description, and click Save draft.
-
Click Publish changes when you have corrected them all.
| Cookie | Category in CookieYes |
|---|---|
| _gpp_js, _gpp_session_id, _gpp_price_display, _gpp_shop_language, _gpp_shop_currency | Necessary (Nødvendig) |
| _gpp_tupv | Functional (Funktionel) |
| _gpp_y, _gpp_purchase_session, landing_page | Analytics |
The full list of the shop's cookies, and what they are used for, is in Cookie banner solutions. CookieYes puts landing_page under Necessary with a description from Shopify. It belongs under Analytics.
The scanner does not add products to the basket and does not log in. That is why _gpp_gcid, the basket's ID, is missing. Add it under Necessary with + Add Cookie.
The Meta pixel
If you use the code from our guide to the Facebook Pixel, it sends no events to Meta before a yes to marketing cookies. Golden Planet's add-on gives it the answer, so you do not need to do anything more.
The code does, however, fetch Meta's script file before the visitor has answered. It sets no cookie and sends no events, but Meta receives the visitor's IP address when the file is fetched. If you want to be sure that nothing goes to Meta before a yes, let CookieYes hold the file back as described below. The price is that the first page the visitor sees is not counted at Meta after a yes.
If you use other code for Meta, for example Meta's own, CookieYes must always hold it back. After the scan, check under the advertising category whether CookieYes has found Meta's cookie _fbp. In our test shop it found none, and Meta's code sent data before the answer. If it is missing, add it like this:
-
Go to Cookie Manager, choose the advertising category (Annonce on a Danish banner), and click + Add Cookie.
-
Fill in the fields:
- Cookie ID:
_fbp - Domain: your shop's domain with a full stop in front, e.g.
.minshop.dk - Duration: 3 months
- Script URL Pattern:
connect.facebook.net - Description: e.g. "Meta uses this cookie to show adverts and measure purchases from adverts on Facebook and Instagram."
- Cookie ID:
-
Click Save draft and then Publish changes.
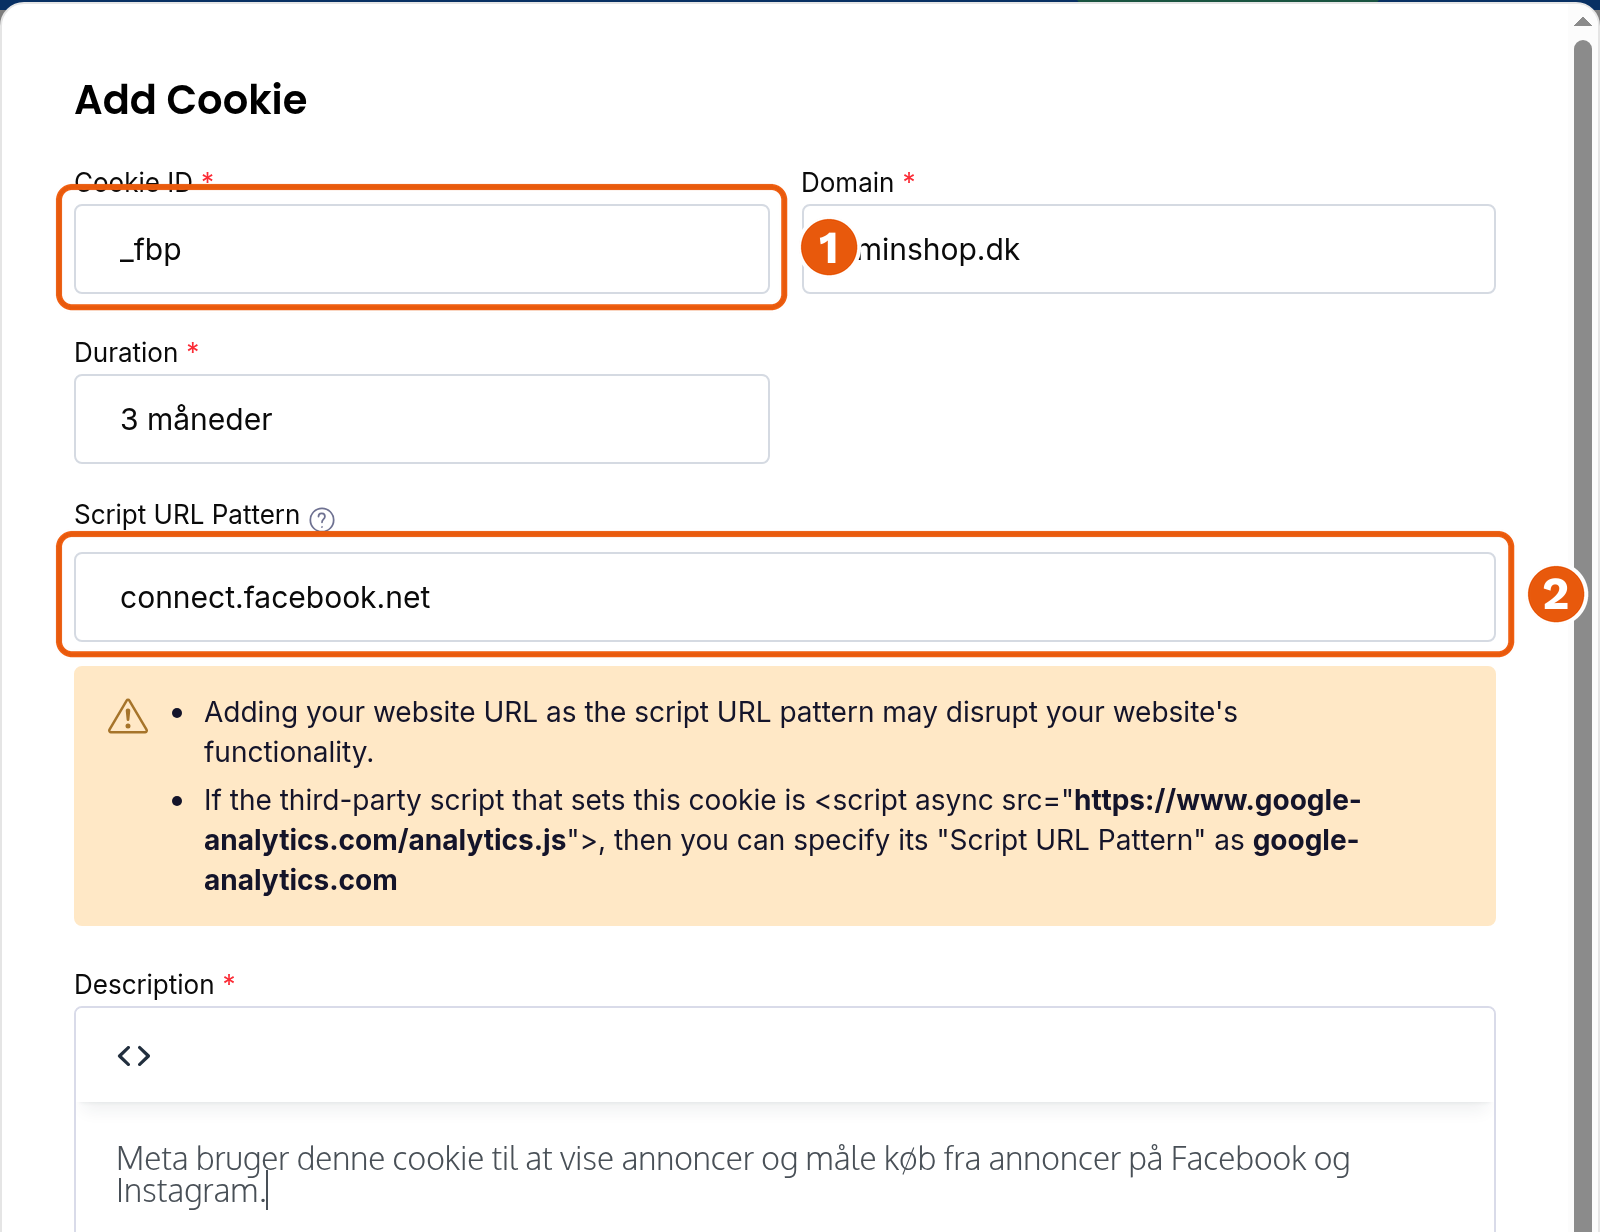
You hold other scripts back in the same way: the Script URL Pattern is the domain the script is loaded from.
Facebook Conversions API
With the Facebook Conversions API, the shop's server sends events directly to Meta, for example purchases. They do not come from the visitor's browser, so neither CookieYes nor any other cookie banner can hold them back.
That does not exempt you from consent. The Conversions API is one of Meta's business tools, and Meta's terms for them (opens in a new tab) say that you must have the right to send the data. In the EU you must have the necessary consents and be able to document them. So mention the Conversions API in your privacy policy, and keep up to date with Meta's terms.
Use the pixel code from our guide together with the Conversions API. It uses the same event IDs, so Meta can see that a purchase from the browser and a purchase from the server are the same.
Let the shop's statistics cookies wait for the answer
The shop's own statistics cookies (_gpp_y, _gpp_purchase_session, landing_page and utm_…) only wait for the answer in the banner when a setting is switched on. It is off by default.
-
Go to General settings under Configuration.
-
Switch on Set tracking cookies only after cookie consent, and click Save changes.
With Golden Planet's add-on, the setting works with CookieYes. In our test shop the cookies were only set after a yes to statistics, and they were deleted again when the answer was taken back. Read more about the setting in Cookie banner solutions.
Check that it works
-
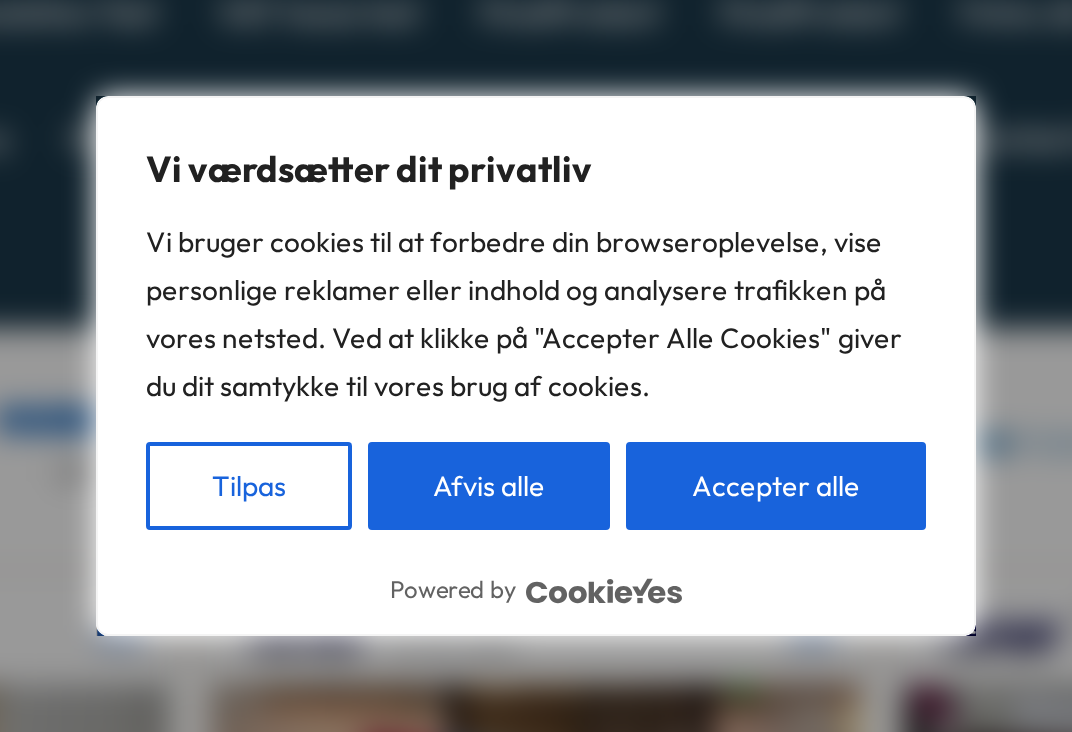
Open your shop in a private window in your browser. The banner should be in the middle of the page, in your shop's language.
-
Click accept, reject or customise.
-
Go to Consent Log in CookieYes. Shortly afterwards your answer is at the top as Accepted, Rejected or Partially accepted. Export as CSV downloads the whole log.
-
In Google Analytics, under Admin > Consent settings, you can see whether Google receives the answers.
Good to know
- The banner text. CookieYes' Danish text says "Accepter Alle Cookies", but the button is called Accepter alle. You correct the text under Cookie Banner > Content > Cookie Notice > Message, and click Publish Changes afterwards.
- Layout. Golden Planet's add-on only moves the banner when you have chosen Box. With Banner it is not moved.
- Several languages. On the free plan the banner has one language. If you also sell in English or German, you need Basic.